FAQ
Tarifs et essai
WaiterOne pour iPad ne coûte que €20 ou 19 CHF par mois (lorsqu'il est payé sur une base annuelle). Il n'y a AUCUN frais caché. Nous ne vous facturons pas les mises à jour, ni les services de quelque nature que ce soit. Installez l'application sur votre iPad et commencez à l'utiliser immédiatement. Nous avons également notre application WaiterOne Remote pour l'iPhone et l'iPod, totalement gratuite. Le KDS (affichage en cuisine) est également disponible gratuitement. En réalité, toutes les applications et services appartenant à WaiterOne sont gratuits à installer et à utiliser. Pensez-vous toujours que WaiterOne est cher ?
Le prix tout compris de WaiterOne sera aussi bas que 20 euros ou 19 CHF par mois (payé annuellement). Toutes les applications, modules complémentaires et services seront inclus. Voici une liste de ce que vous obtenez pour votre argent :
- Application iPad WaiterOne
- Notre célèbre support, tout le monde est V.I.P. maintenant
- Autant de télécommandes WaiterOne pour iPhone, iPod et iPad que vous le souhaitez
- Autant de KDS que vous le souhaitez : système d'affichage cuisine (ou bar)
- Tableau de bord Cloud : consultez vos ventes en temps réel où que vous soyez
- Sauvegarde Cloud : sauvegardez vos paramètres en ligne sur notre cloud
- Système de commande client : laissez vos clients commander de chez eux ou dans votre entreprise
- Mises à jour pour toutes les applications
Pour ce prix mensuel, vous pouvez utiliser autant de télécommandes que vous le souhaitez, donc maintenant chaque serveur pourrait avoir une télécommande en fait. Il en va de même pour le KDS. Démarrer n'a jamais été aussi abordable. 20,- Euro, tout compris.
Vous pouvez également payer pour 1, 3 ou 6 mois. Donc, si vous avez une activité saisonnière ou événementielle, vous n'avez à payer que pour la période où vous utilisez le système.
Vous pouvez également installer une version d'essai de WaiterOne. Vous pourrez découvrir toutes les fonctionnalités étonnantes de WaiterOne sans aucune limite.
Si vous avez des questions sur ce changement, n'hésitez pas à nous contacter. Toujours disponible, toujours prêt à aider.
En effet, €20 ou 19CHF par mois est un prix vraiment raisonnable. Avec WaiterOne, vous n'aurez pas besoin de matériel supplémentaire coûteux, comme un écran tactile à €500/$500 ou un PC lent et problématique exécutant un système d'exploitation sujet aux plantages après les mises à jour ou les problèmes de disque. Vous n'aurez pas non plus besoin de logiciel coûteux, comme un module de back-office fonctionnant sur un serveur SQL excessivement coûteux. Vous n'aurez pas besoin d'un contrat de support contraignant non plus - nous n'enverrons pas d'ingénieurs coûteux pour réparer des ventilateurs défectueux, et vous ne serez pas facturé pour les mises à jour mensuelles.
Chez WaiterOne, nous évitons les gadgets extravagants ou les tactiques de vente flamboyantes. Au lieu de cela, nous nous concentrons sur l'offre d'une expérience sans faille avec la combinaison parfaite du logiciel WaiterOne et du matériel fiable - l'iPad, l'iPhone et l'iPod. Notre système est conçu pour fonctionner de manière impeccable sans avoir besoin d'un support constant, ce qui nous distingue des autres solutions de point de vente.
Bien sûr, si vous avez des doutes, ne vous inquiétez pas - nous comprenons. Si vous trouvez une solution de point de vente plus chère pour votre entreprise, nous sommes convaincus que vous réaliserez bientôt la valeur inégalée et l'accessibilité offertes par WaiterOne.
Premiers pas
OUI, il y en a un : vous pouvez télécharger gratuitement WaiterOne depuis l'App Store. Toutes les fonctions fonctionneront . Alors téléchargez simplement WaiterOne et commencez à le tester.
Oui. Ces guides sont disponibles :
- Manuel en ligne: Manuel en ligne WaiterOne
- Démarrage: GettingStartedWithWaiterOne.pdf
- Système de Commande Client (COS): COS.pdf
- Module TSE: TSE.pdf
- Configuration Fiskaly: Fiskaly_in_WaiterOne.pdf
- Tap to Pay: Tap_to_Pay_WaiterOne.pdf
- Activation FDM Belgique: Belgium_FDM_Activation_Guide.pdf
Vos retours sur les guides sont toujours les bienvenus.
WaiterOne fonctionne exclusivement sur votre iPad, ce qui élimine la nécessité d'une connexion Internet dans votre bar ou restaurant. Non seulement cela offre plus de commodité, mais c'est aussi un avantage significatif par rapport à bon nombre de nos concurrents. Même si vous êtes en déplacement et que vous servez des gaufres ou des hamburgers depuis votre food truck, WaiterOne vous couvre. Avec nous, vos données sont toujours accessibles, assurant des opérations fluides même lorsque l'internet est lent ou indisponible. Tout continue de fonctionner à la même vitesse fulgurante, garantissant un service ininterrompu.
Nous pensons que tout le monde devrait avoir un iPod Touch ou iPhone avec WaiterOne comme système de commande personnel. C'est pourquoi nous l'avons rendu gratuit pour que vous puissiez en profiter et vous amuser en l'utilisant. En fait, depuis le début de 2017, tous les modules complémentaires et applications WaiterOne sont gratuits, tout est inclus. C'est très pratique pour nous, sans frais administratifs, et c'est aussi très économique pour vous.
Vous pouvez connecter autant de télécommandes que vous le souhaitez (gratuitement !!). Il n'y a aucune limite logicielle.
Commandes et configuration
Vous devez suivre ces étapes :
- 1. Téléchargez WaiterOne Remote pour iPad/iPhone/iPod depuis l'App Store d'Apple.
- 2. Connectez votre iPad/iPhone/iPod à votre réseau local. Assurez-vous que votre appareil se trouve dans la même plage que votre iPad principal ou votre point d'accès.
- 3. Activez le serveur Remote sur votre iPad dans Paramètres -> WaiterOne Remote. Vous devriez également voir l'adresse IP de votre iPad principal ici, car vous en aurez peut-être besoin pour configurer votre Remote.
- 4. Lancez WaiterOne Remote sur votre iPad/iPhone/iPod, allez dans les paramètres, et votre iPad devrait devenir visible dans le champ hôte. Si ce n'est pas le cas, saisissez ici l'adresse IP de votre iPad principal de WaiterOne. Saisissez votre code de serveur, cliquez sur télécharger, et vous devriez voir les boutons être téléchargés depuis votre iPad principal.
- 5. Si le téléchargement ne fonctionne pas, allez dans les paramètres de votre iPad principal de WaiterOne (pas les paramètres de WaiterOne). En bas à gauche, il y a également quelques paramètres pour WaiterOne. Assurez-vous que le réseau local est activé et que la localisation est réglée sur 'toujours'. Activez-le et réessayez. Faites de même dans les paramètres de votre Remote, activez le réseau local s'il ne fonctionne pas.
Nous utilisons un protocole appelé ‘Bonjour’. Parfois, votre point d'accès le bloque ou il n'est tout simplement pas bien transmis/reçu. Vérifiez que vous n'avez pas de pare-feu en cours d'exécution sur votre point d'accès. Un client a signalé que le fait de changer la 'largeur de canal' en automatique a résolu son problème. Imaginez cela! Vous pouvez également entrer l'adresse IP de votre iPad principal dans les paramètres de votre télécommande. Voir la FAQ précédente.
Il y a beaucoup de malentendus à ce sujet. Et d'autres vendeurs de POS l'utilisent pour dire qu'ils sont approuvés. Mais il n'existe pas d'approbation pour l'Allemagne de ce genre. Bientôt nous aurons une version allemande de WaiterOne, dans ce cas toutes les données seront cryptées. Jetez un œil à ceci et revenez nous voir si les choses ne sont pas encore claires.
Il n'y a pas de certificat officiel nécessaire, mais les règles sont strictes. WaiterOne s'efforce de respecter toutes les réglementations locales.
WaiterOne 1.8 est conforme au FDM de Belgique. Contactez-nous si vous souhaitez en savoir plus.
Oui et non ! En raison de lois américaines sur le chiffrement un peu idiotes, nous n'avons pas chiffré les données sur WaiterOne. Donc, vos données ne sont pas chiffrées et peuvent être lues par quiconque les récupère. En fin de journée, vous pouvez supprimer toutes vos ventes, vous pouvez donc recommencer le lendemain. Rien de grave à craindre.
Sauvegarde et données
Si vous souhaitez transférer votre WaiterOne vers un autre iPad, voici la procédure à suivre:
- Téléchargez WaiterOne depuis l'Apple AppStore sur votre nouvel iPad.
- Installez un compte de messagerie électronique sur les deux iPads si vous souhaitez transférer votre base de données par email. Activez le Bluetooth si vous souhaitez transférer votre base de données avec AirDrop (AirDrop ne fonctionne pas sur les anciens appareils).
- Sur l'ancien iPad, allez dans les paramètres -> données -> sauvegarde et cliquez sur sauvegarde, sélectionnez Email ou AirDrop. Si vous souhaitez transférer votre base de données par email, vous devrez avoir un compte de messagerie électronique installé sur les deux iPads. Une page web de messagerie en ligne ne fonctionnera pas. Si vous souhaitez transférer avec AirDrop, vous aurez besoin d'iPad compatibles et le Bluetooth doit être activé sur les deux iPads.
- Sur le nouvel iPad, si vous travaillez avec l'email, cliquez pendant 2 secondes sur le fichier w1.db.zjp et envoyez-le/copiez-le sur WaiterOne. Avec AirDrop, vous pouvez l'envoyer/copier immédiatement sur WaiterOne.
- Le nouvel iPad devrait redémarrer WaiterOne. Une fois terminé, contactez-nous car nous devons transférer votre licence.
La base de données est visible dans iTunes ou sur votre Mac (partage de fichiers), vous pouvez faire glisser w1.db, le déposer et le sauvegarder sur votre Mac ou PC à des fins de sauvegarde.
Nous avons également ajouté une fonction de sauvegarde dans les 'Paramètres' de WaiterOne maintenant. Sous Paramètres -> Données -> Sauvegarde. De cette façon, vous pouvez sauvegarder vos données en vous envoyant un e-mail avec la sauvegarde en pièce jointe ou vous pouvez sauvegarder vos données dans le cloud.
Dans la dernière version de WaiterOne, vous pouvez également activer la sauvegarde automatique dans le cloud. Ainsi, vous n'oublierez pas de sauvegarder vos données.
La base de données peut être restaurée de 2 manières différentes :
avec un e-mail configuré sur votre iPad, vous pouvez ouvrir directement le fichier de base de données w1.db. Il suffit de cliquer quelques secondes sur la pièce jointe zip w1.db, une fenêtre contextuelle s'ouvrira, puis sélectionnez 'Copier dans WaiterOne‘
Ouvrir dans WaiterOne
Copier dans WaiterOne
avec iTunes (Partage de fichiers), vous pouvez faire glisser la base de données précédemment stockée w1.db de votre Mac ou PC vers iTunes. Voici comment faire :
- Connectez votre iPad à votre Mac ou PC,
- Ouvrez iTunes (si ce n'est pas déjà fait),
- Cliquez sur votre iPad fraîchement connecté dans iTunes,
- Cliquez sur Applications,
- Faites défiler vers le bas jusqu'à ce que vous voyiez 'Partage de fichiers',
- Cliquez sur WaiterOne,
- Faites maintenant glisser et déposez le fichier w1.db depuis l'endroit où vous l'avez stocké, dans les documents de WaiterOne. Vous pouvez également cliquer sur le bouton Ajouter… au cas où le glisser-déposer serait trop compliqué,
- (Re)démarrez WaiterOne.
Si vous entrez un mauvais code plus de 3 fois, un fichier nommé 'passwords.txt' sera créé.
Sur votre Mac, ouvrez Finder et accédez à votre iPad, allez dans Fichiers et cliquez sur WaiterOne. Sur PC, vous devrez utiliser le programme iTunes.
Vous devriez y trouver un fichier appelé 'passwords.txt'. Copiez-le sur votre Mac ou PC. Ce fichier peut être ouvert avec n'importe quel éditeur. Une liste d'utilisateurs et de mots de passe devrait s'y trouver.
Vous pouvez également copier le fichier 'w1.db' sur votre Mac ou PC et nous l'envoyer par e-mail pour que nous puissions le déverrouiller.
Oui. Vous pouvez modifier la longueur des codes utilisateurs, et vous pouvez aussi configurer WaiterOne pour que les utilisateurs ne soient pas automatiquement déconnectés après un certain nombre de secondes.
Si vous ne voulez pas saisir de code, vous pouvez utiliser la connexion par QR code :
- Allez dans les réglages de WaiterOne, cliquez sur barcode, activez software barcode, utilisez la caméra avant et activez blind mode.
- Allez dans Data -> Users, sélectionnez l’utilisateur, puis cliquez sur le bouton QR Code à côté du code.
- Déconnectez-vous et tenez le QR code devant la caméra de l’iPad pour vous connecter.
Vous pouvez aussi utiliser la biométrie pour entrer comme administrateur.
Boutons et tables
Au lieu de travailler avec des lignes et des colonnes à mémoriser, vous pouvez glisser-déposer les boutons en les maintenant un peu plus longtemps qu’un appui normal. Essayez, c’est pratique.
Vous pouvez aussi ajouter plus de lignes et de colonnes en glissant un bouton vers la ligne plus ou la colonne plus. Si nécessaire, vous pouvez également glisser des boutons vers d’autres pages.
La taille des boutons dans WaiterOne est calculée par l'application elle-même. Vous n'avez pas besoin de spécifier la taille d'un bouton. Tout dépend du nombre de lignes et de colonnes que vous avez sur vos pages. Plus vous avez de lignes ou de colonnes, plus les boutons seront petits.
Il existe plusieurs façons de travailler avec les tables dans WaiterOne. Vous pouvez voir une liste des tables lorsque vous cliquez sur le total dans le coin supérieur droit, ou vous pouvez travailler avec une visualisation des tables. Nous l'appelons plan de tables old- et new-school. Le plan de tables old-school est simplement une liste de tables triées par nom. Le plan de tables new-school est tel qu'il apparaît dans votre entreprise. Pour le modifier, allez dans vos paramètres dans WaiterOne (paramètres -> paramètres généraux -> tables -> plan de tables).
Vous pouvez déplacer une table à plusieurs endroits. Dans le plan de tables visuel new-school, cliquez sur une table et faites-la glisser vers une autre table. Toutes les commandes seront transférées vers l’autre table.
Cela fonctionne maintenant aussi avec le plan de tables old-school. Vous pouvez également déplacer une table depuis la liste des tables/clients : cliquez sur le total en haut à droite de l’écran principal du POS pour ouvrir la liste, puis déplacez la table depuis cette liste.
Vous connaissez ces événements où les gens achètent des billets à un guichet spécifique et vont ensuite chercher leurs boissons ailleurs ? Eh bien, WaiterOne peut aussi le faire !
Dans les imprimantes, vous pouvez définir un paramètre pour imprimer un billet pour chaque produit que vous avez commandé. Imaginez que vous ayez un client qui souhaite payer pour 5 boissons. WaiterOne imprimera 5 bons pour votre client, il pourra ensuite les échanger au bar quand il le souhaite.
Jetez un œil à ces paramètres (données -> imprimantes -> tickets -> séparation entre les produits) :
Imprimantes et impression
Autant que vous le souhaitez, nous avons toujours testé avec 3 imprimantes, une dans le bar, une dans la cuisine et une pour imprimer les factures. Si vous le souhaitez, vous pouvez également utiliser 1 imprimante pour 2 endroits différents, disons que le bar et l'endroit où vous voulez vos reçus ne sont pas si éloignés l'un de l'autre. Essayez d'abord avec une imprimante, mais créez 2 imprimantes dans WaiterOne, de cette façon WaiterOne imprimera 2 tickets sur la même imprimante, un pour le bar et un pour le reçu. Si vous n'êtes pas satisfait du résultat, ajoutez une autre imprimante, aussi simple que ça.
Vous pouvez connecter une imprimante de tickets à WaiterOne si elle dispose d'une interface Ethernet, Bluetooth ou Wi-Fi, USB/Lightning ne fonctionne qu'avec les dernières imprimantes Star TSP143III USB et Epson TM-m30II-NT, le série et le parallèle ne fonctionneront pas ou vous devriez utiliser un serveur d'impression ou un dongle intermédiaire. Normalement (lorsque vous utilisez Ethernet ou Wi-Fi), vous devez connecter votre imprimante à votre point d'accès et la configurer de sorte qu'elle ait une adresse IP dans la même plage réseau que votre point d'accès et votre iPad. Ne configurez pas votre imprimante (et votre iPad) avec DHCP, car votre adresse IP changera de temps en temps, ce qui entraînera des problèmes de connexion par la suite. Si vous ne savez pas ce qu'est une adresse IP, faites-la configurer par un technicien informatique (ou envoyez-nous un e-mail).
Si vous rencontrez des problèmes pour connecter votre imprimante Epson à votre réseau. Veuillez utiliser l'utilitaire EpsonNet Config (PC et Mac). Vous pouvez configurer votre imprimante en utilisant d'abord un câble USB et la tester sur votre réseau. Voici le lien vers la page Epson pour cet utilitaire.
Epson a une application géniale pour configurer votre imprimante, veuillez la consulter : Epson TM Utility
*L'Epson™ TM-T88V avec interface Wi-Fi a une fonctionnalité très intéressante qui vous évite d'avoir besoin d'un point d'accès. Vous pouvez connecter votre iPad directement au SSID ad-hoc EpsonNetIBSS ou EpsonNet. Vous pouvez même y ajouter d'autres appareils. L'adresse IP par défaut de l'imprimante est 192.168.192.168. Conclusion : 1 imprimante Epson avec Wi-Fi + 1 iPad avec WaiterOne. Rien de plus ! Pas de câbles (sauf pour l'alimentation de votre imprimante) ! Magnifique ! GÉNIAL !
Oui, vous pouvez! Vous pouvez utiliser une imprimante normale à jet d'encre ou laser (compatible avec AirPrint) pour imprimer de belles factures pour vos clients (par exemple, un hôtel ou un restaurant étoilé Michelin). Vous pouvez également l'utiliser pour imprimer vos résultats. Pour obtenir une liste des imprimantes compatibles, consultez le site Web d'Apple ou recherchez AirPrint sur Google. Nous avons utilisé une imprimante tout-en-un de $80 d'HP, tout simplement parfaite!
Nous avons testé WaiterOne avec les imprimantes de tickets Epson™. Les Epson™ TM-T88IV et TM-T88V, en Wi-Fi et en LAN (Ethernet), fonctionnaient parfaitement. Vous pouvez utiliser une autre marque si elles sont compatibles avec Epson™ et disposent d'une interface Ethernet, Wi-Fi ou Bluetooth*. Si vous avez connecté une autre marque ou si vous rencontrez des problèmes de connexion, faites-le nous savoir. Veuillez nous contacter avant d'acheter une imprimante, ne soyez pas un héros, nous ne voulons pas que vous achetiez une imprimante qui ne fonctionne tout simplement pas.
Voici une liste d'imprimantes compatibles avec WaiterOne :
Epson :
- Epson™ TM-T20, TM-T20II et TM-T20III : enfin une imprimante de PDV à budget réduit avec une interface Ethernet
- Epson™ TM-T70II : interface Ethernet et Wi-Fi
- Epson™ TM-T88III, TM-T88IV, TM-T88V, TM-T88VI, TM-T88VII, TM-T90, TM-T82 et TM-T82II
- Epson™ TM-m30 : une nouvelle imprimante fantastique d'Epson
- Epson™ TM-U220 : c'est une imprimante matricielle, idéale si vous voulez une imprimante de cuisine rétro
- Epson™ TM-m30
- la nouvelle imprimante de PDV Epson™ TM-m30
Les imprimantes 'intelligentes' d'Epson ne fonctionnent pas avec WaiterOne. Alors, s'il vous plaît, ne investissez pas dans un TM-T88V-i ou une autre imprimante Epson où un 'i' est ajouté au nom. WaiterOne n'a pas besoin d'imprimantes intelligentes, tout ce dont elles ont besoin, c'est d'imprimer, la réflexion réelle est faite par WaiterOne 😉
L'application Epson TM Utility dispose de tous les outils pour configurer votre imprimante Epson. Veuillez y jeter un œil : Epson TM Utility
Citizen :
- Citizen™ CT-S310II
- Série Citizen™ CT-S600
- Série Citizen™ CT-S800 : Ces imprimantes ont un écran LCD, et nous avons réussi à l'utiliser comme écran client. Très impressionnant et utile !
Star :
- Star™ TSP650, TSP650II : Ethernet et Bluetooth
- Star™ TSP143 : ils ont une nouvelle version de cette imprimante qui fonctionne avec le câble Lightning de votre iPad
MPOS :
- MPOS-TP220I : semble fonctionner, selon certains clients
- Bixolon SRP350IIE : devrait fonctionner, (en attente) en attendant un modèle à tester ici
Rongta :
- Rongta RP80 ou RP80W : la version Wi-Fi est très abordable !
- Rongta RPP300 : imprimante portable Bluetooth et Wi-Fi (en test)
Metapace :
- Metapace T-3 : semble fonctionner, selon certains clients
Sam4s :
- Giant-100 : version Wi-Fi fonctionne. Vous devez changer le port de 5000 à 9100. Il y a un outil du fabricant pour le faire.
WaiterOne :
- KDS : Vous ne voulez pas d'une imprimante, je suppose que vous voulez sauver un arbre ? Regardez notre KDS.
*Avez-vous une ancienne imprimante POS USB (ou avez-vous acheté la mauvaise imprimante et elle n'a qu'une interface USB) ? Alors il y a encore de l'espoir pour vous. Certains routeurs/points d'accès ont une interface USB qui peut être utilisée pour connecter votre imprimante. Un client a réussi à faire fonctionner son ancien Metapace T-3 avec une interface USB sur un FRITZ!Box 7930 🙂 Ou, encore une fois, à partir de ce même client, optez pour un serveur d'impression sans fil (comme le TP-Link TL-WPS510U Wi-Fi vers USB) et installez votre imprimante USB sans fil dans votre cuisine.
**Je suppose qu'un Apple Airport Express avec USB devrait également fonctionner. J'ai besoin de le tester une fois. Si vous l'avez, faites-le nous savoir !
WaiterOne a besoin d'une imprimante connectée à votre réseau ou à votre iPad. Votre imprimante doit donc avoir une interface Ethernet, une interface Bluetooth ou une interface Wi-Fi. Certaines imprimantes ont également une interface spéciale pour iPad avec Lightning. Veuillez donc nous demander avant d'investir dans une imprimante.
Maintenez enfoncé le bouton 'pair' à l'arrière de votre imprimante pendant 5 secondes, le voyant LED commencera à clignoter. Vous avez maintenant 60 secondes pour associer votre imprimante dans les paramètres -> Bluetooth de votre iPad. Veuillez télécharger StarIO SDK depuis l'App Store d'Apple et essayez de vous connecter à votre imprimante, réglez également 'Connexion automatique' sur 'Activé' dans vos paramètres Bluetooth.
De l'un de nos clients. Merci à Ingemar V.
- Téléchargez Star Utility/Setting depuis l'App Store.
- Éteignez l'une des imprimantes.
- Dans l'application Star Utility (ou Paramètres), changez le nom de Star Micronics en Star Micronics2 (ou tout autre nom).
- Dans les données -> imprimantes, changez le nom en Star Micronics2. Allumez l'autre imprimante et connectez-la dans les données -> imprimantes -> bar avec Star Micronics et cuisine avec Star Micronics2.
Assurez-vous d'avoir le nom de votre imprimante trouvé dans l'application StarPRNT SDK (le mien était TSP654). Remplissez ce nom dans le champ Hôte de votre imprimante (données -> imprimantes), mais ajoutez 'BT :' devant (vous devriez avoir par exemple BT:TSP654). Réglez le 'Type d'imprimante' sur Star Line Mode. Désactivez la police Big Font, réglez les caractères A sur 48, les caractères B sur 64.
Configurez également la page de code de cette imprimante Star sur 32 dans WaiterOne. Sinon, certains caractères ne seront pas imprimés correctement (par exemple, le symbole €).
PS : Certains clients ont eu des problèmes avec le nom d'origine de l'imprimante, une fois changé de StarMicronics à par exemple TSP654, tout a parfaitement fonctionné.
Star a sorti cette imprimante POS USB unique en son genre qui fonctionne avec l'iPad (et WaiterOne) : le Star TSP143IIIU. La particularité de cette imprimante est que vous n'avez pas besoin de réseau ni de compétences en informatique pour l'installer.
- 1. Connectez votre imprimante à votre iPad avec votre câble Lightning (USB côté imprimante, Lightning côté iPad).
- 2. Dans WaiterOne, allez à données -> imprimante -> facture -> général -> hôte et saisissez : USB:TSP100
- 3. Dans les mêmes paramètres que ci-dessus, sélectionnez le mode Star Raster comme type d'imprimante.
Voilà ! Appuyez sur le code QR à côté de l'adresse hôte dans WaiterOne et un petit ticket devrait être imprimé.
- 1. Connectez votre imprimante à votre iPad avec votre câble Lightning (USB côté imprimante, Lightning côté iPad).
- 2. Maintenant, nous devons trouver le numéro de série USB de votre imprimante. Il peut être trouvé en imprimant une page de test (allumez l'imprimante tout en maintenant le bouton d'alimentation enfoncé) ou en installant l'application Epson TM Utility (disponible sur l'Apple App Store). Lorsque vous exécutez cette application et que vous recherchez vos imprimantes connectées, le numéro de série apparaîtra. Le numéro de série comporte 18 caractères !
- 3. Dans WaiterOne, allez à données -> imprimantes -> facture -> général -> hôte et entrez : USB + numéro de série (par exemple, USB:5839394E0004360000)
- 4. Dans les mêmes paramètres que ci-dessus, sélectionnez Epson ePOS SDK comme type d'imprimante.
Voilà ! Appuyez sur le code QR à côté de l'adresse hôte dans WaiterOne et un petit ticket devrait être imprimé.
Veuillez également vérifier si votre marque d'imprimante n'a pas d'application pour effectuer cette tâche. Epson a cet utilitaire ici : Epson TM Utility
Méthode alternative pour configurer votre imprimante (j'aime beaucoup cette méthode, mais encore une fois, je suis développeur de logiciels ;))
macOS sur un ordinateur Apple : Ouvrez le terminal et tapez :
- sudo arp -d [Adresse IP temporaire de l'imprimante]
- sudo arp -s [Adresse IP temporaire de l'imprimante] [Adresse MAC de l'imprimante]
- ping -c 4 [Adresse IP temporaire de l'imprimante]
Windows : Ouvrez l'invite de commande et tapez (exécutez-la en tant qu'administrateur, allez dans la zone d'exécution, tapez cmd, puis appuyez sur contrôle + shift + entrée)
- arp -d [Adresse IP temporaire de l'imprimante]
- arp -s [Adresse IP temporaire de l'imprimante] [Adresse MAC de l'imprimante]
- ping -n 4 [Adresse IP temporaire de l'imprimante]
Exemple sous Windows, lorsque vous changez l'adresse IP de l'imprimante en 192.168.0.168 :
- arp -d 192.168.0.168
- arp -s 192.168.0.168 00-26-ab-d5-b9-84
- ping -n 4 192.168.0.168
Exemple sur Apple, lorsque vous changez l'adresse IP de l'imprimante en 192.168.0.168 :
- sudo arp -d 192.168.0.168
- sudo arp -s 192.168.0.168 00:26:ab:d5:b9:84
- ping -c 4 192.168.0.168
L'adresse MAC de l'imprimante peut être trouvée sur la page de test de l'imprimante. Allumez l'imprimante tout en maintenant enfoncé le bouton d'avance.
Réglez la page de code sur 18 (au lieu de 16) dans les données -> imprimantes. Pour l'Epson m30II avec connexion lightning, vous pouvez même régler la page de code sur 24(!) et le jeu de caractères sur 2.
Voici la liste complète :
Page de code
0 PC437 : USA, Europe standard
1 Katakana
2 PC850 : Multilingue
3 PC860 : Portugais
4 PC863 : Canadien-français
5 PC865 : Nordique
11 PC851 : Grec
12 PC853 : Turc
13 PC857 : Turc
14 PC737 : Grec
15 ISO8859-7 : Grec
16 WPC1252 *** standard pour ESP/POS
17 PC866 : Cyrillique #2
18 PC852 : Latin2 *** standard pour ePOS SDK
19 PC858 : Euro
20 KU42 : Thaï
21 TIS11 : Thaï
26 TIS18 : Thaï
30 TCVN-3 : Vietnamien
31 TCVN-3 : Vietnamien
32 PC720 : Arabe
33 WPC775 : Baltique
34 PC855 : Cyrillique
35 PC861 : Islandais
36 PC862 : Hébreu
37 PC864 : Arabe
38 PC869 : Grec
39 ISO8859-2 : Latin2
40 ISO8859-15 : Latin9
41 PC1098 : Farsi
42 PC1118 : Lituanien
43 PC1119 : Lituanien
44 PC1125 : Ukrainien
45 WPC1250 : Latin2
46 WPC1251 : Cyrillique
47 WPC1253 : Grec
48 WPC1254 : Turc
49 WPC1255 : Hébreu
50 WPC1256 : Arabe
51 WPC1257 : Baltique
52 WPC1258 : Vietnamien
53 KZ-1048 : Kazakhstan
255 Page définie par l'utilisateur
Jeu de caractères
0 USA
1 France
2 Allemagne
3 Royaume-Uni
4 Danemark I
5 Suède
6 Italie
7 Espagne I
8 Japon
9 Norvège
10 Danemark II
11 Espagne II
12 Amérique latine
13 Corée
14 Slovénie/Croatie
15 Chine
16 Vietnam
17 Arabie
Réglez la table de codes sur 32 (au lieu de 16) dans les données -> imprimantes. Réglez le type d'imprimante sur Mode Ligne Star.
Pour le Star mC-Print3, réglez les caractères de la police A sur 48 et de la police B sur 64. Pour son homologue plus petit, le mC-Print2, réglez les caractères de la police A sur 32 et de la police B sur 42. Nous n'avons pas personnellement testé le Star mC-Print2. Merci de nous informer si tout fonctionne bien!
Nous avons testé WaiterOne avec l'imprimante de tickets mobile Citizen™ CMP-30 et Epson™ TM-P60. Très compactes, robustes et puissantes. Nous n'avons pas réussi à connecter notre application à la version Bluetooth, mais la version Wi-Fi fonctionnait parfaitement. Mise à jour : nous retestons actuellement WaiterOne avec quelques imprimantes Bluetooth. Besoin de plus d'informations ? Contactez-nous.
Ajouter un logo à vos tickets peut considérablement améliorer l'apparence de vos reçus. Vous avez bien sûr besoin d'une version numérique de votre logo d'entreprise. Selon l'imprimante, la taille d'un logo peut être au maximum de 512 pixels (Epson TM-T88) ou 576 pixels (Epson TM-T20) de largeur. Cela dépasse le cadre de cette FAQ, mais des compétences de dessin informatique de base pourraient être nécessaires pour ajuster votre logo à la bonne taille. La plupart des applications de dessin/peinture par défaut que vous trouverez sur votre ordinateur devraient faire l'affaire, pas besoin de maîtriser Photoshop ou autre. Si vous cherchez un éditeur de peinture en ligne, vous en trouverez sûrement quelques-uns pour éditer votre logo.
En fonction de la marque (et/ou du modèle) de votre imprimante, vous pouvez faire ce qui suit. Si votre imprimante n'est pas répertoriée ou ne fonctionne pas, faites-le nous savoir. N'oubliez pas de sélectionner le bon type d'imprimante (= pilote) dans WaiterOne (Données -> Imprimantes -> ... -> Général -> Type d'imprimante). Si vous êtes un fabricant d'imprimantes et que vous souhaitez que votre imprimante soit répertoriée ici, faites-le nous savoir, et/ou peut-être nous prêter une imprimante pour que nous puissions l'intégrer complètement et la tester avec WaiterOne.
A : Epson™ (la plupart des modèles, mais nous testons avec l'Epson TM-T88V avec Wi-Fi) :
Epson a une application sympa qui fait le travail (et plus) : Epson TM Utility. Téléchargez cette application sur votre iPad.
Téléchargez d'abord votre logo d'entreprise (ou toute autre image que vous voulez imprimer) sur votre imprimante de tickets. Cela dépasse le cadre de cette FAQ d'expliquer comment utiliser cet utilitaire, mais vous devriez télécharger votre logo à la première place de l'image, c'est-à-dire (32,32).
Dans WaiterOne, sous Paramètres -> Général -> En-tête (ou pied de page) du ticket, ajoutez le code suivant : <logo>. Vous pouvez également ajouter un deuxième logo en utilisant <logo2> (32,33).
B : Star™ en mode ligne (par exemple, Star TSP650II) :
Téléchargez d'abord votre logo d'entreprise (ou toute autre image que vous voulez imprimer) sur votre imprimante de tickets. Téléchargez et installez l'Utilitaire d'Imprimante Star™ Micronics (voir www.starmicronics.com et sélectionnez votre imprimante), le logiciel est disponible uniquement pour Windows. Une fois lancé, cliquez sur Logo Store. Téléchargez vos logos, votre premier logo devrait avoir le Code Clé 01, votre deuxième logo 02, et ainsi de suite.
Dans WaiterOne, sous Paramètres -> Général -> En-tête (ou pied de page) du ticket, ajoutez le code suivant : <logo>. Vous pouvez également ajouter un deuxième logo en utilisant <logo2>. Si vous souhaitez ajouter plus de 2 logos, vous devriez ajouter vos propres balises, le logo3 devrait alors être <27,28,112,3,48> (où 3 est le troisième logo).
C : Star™ en mode raster (par exemple, Star TSP143III) :
Téléchargez votre logo d'entreprise (ou toute autre image que vous voulez imprimer) dans le dossier de partage de fichiers de WaiterOne sur votre iPad. Le logo devrait avoir le nom du nom d'imprimante que vous avez utilisé dans données -> imprimante en lettres minuscules. Par exemple, si vous voulez un logo sur votre imprimante de facturation, appelez-le bill.png.
MISE À JOUR POUR LA VERSION 1.5 : L'image doit avoir exactement le même nom que le nom de l'imprimante. Donc, si votre imprimante s'appelle Bill, alors l'image devrait s'appeler Bill.png, si votre imprimante s'appelle Kitchen, elle devrait être Kitchen.png. En effet, vous pouvez également imprimer un logo sur les tickets de commande.
D : Xiamen Rongta Technologies™ (par exemple, RP80W et RPP300) :
Téléchargez d'abord votre logo d'entreprise (ou toute autre image que vous voulez imprimer) sur votre imprimante de tickets. Utilisez le logiciel Rongta Tech pour cela. Le logiciel est un peu difficile à utiliser, pas de retour si vous téléchargez un logo. De plus, il ne fonctionne que sous Windows.
Dans WaiterOne, sous Paramètres -> Général -> En-tête (ou pied de page) du ticket, ajoutez le code suivant : <28,112,1,48>. Vous pouvez également ajouter un deuxième logo en utilisant <28,112,2,48>. Nous avons ajouté une balise de marque spéciale pour cela, à partir de la version 1.3.17 vous pouvez utiliser <printlogo> et <printlogo2> au lieu des moches codes hexadécimaux.
Le logo fonctionne également sur l'imprimante portable Rongta RPP300. Cependant, il y a une différence, le logo ne semble pas être centré ! Ce ne devrait pas être un problème, ajoutez simplement un peu d'espace blanc devant et tout devrait aller bien.
E : Citizen™ (par exemple, Citizen CT-S851) :
Téléchargez d'abord votre logo d'entreprise (ou toute autre image que vous voulez imprimer) sur votre imprimante de tickets. Utilisez le logiciel Citizen appelé Citizen POS Printer Utility (voir www.citizen-systems.com et sélectionnez votre imprimante). Utilisez d'abord le bouton 'Mode change' pour définir le mode sur 'Mode de code clé inutilisé' et nommez votre premier logo 01. Le logiciel est assez impressionnant et l'un des plus avancés que nous ayons vus jusqu'à présent pour configurer une imprimante.
Dans WaiterOne, sous Paramètres -> Général -> En-tête (ou pied de page) du ticket, ajoutez le code suivant : <28,112,1,48>. Vous pouvez également ajouter un deuxième logo en utilisant <28,112,2,48>. Nous avons ajouté une balise de marque spéciale pour cela, à partir de la version 1.3.17 vous pouvez utiliser <printlogo> et <printlogo2> au lieu des moches codes hexadécimaux.
Maintenez le bouton d'avance enfoncé tout en allumant l'imprimante. Vérifiez si votre carte est présente ? Si ce n'est pas le cas, appuyez plus longtemps que 1 seconde. Puis naviguez dans les différents menus, en appuyant légèrement pour indiquer l'élément de menu souhaité, puis pendant 1 seconde pour le sélectionner : 11 (Paramètres d'interface USB) -> 1 (Classe) -> 1 (Classe fournisseur). Enregistrez tout en appuyant pendant 1 seconde, répétez jusqu'à sortir du menu.
Oui. Mettez le nombre de copies de l’imprimante ticket concernée sur 0 (Data -> Printers). WaiterOne n’imprimera alors pas de ticket par défaut.
Si vous avez quand même besoin d’un ticket, vous avez plusieurs options : demander une copie du ticket depuis l’écran principal, cliquer sur le bouton Tickets dans les boutons spéciaux, ou faire un appui long sur le bouton addition/paiement pour inverser le comportement par défaut et imprimer un ticket malgré tout.
L’inverse fonctionne aussi : si les copies sont réglées sur 1 et qu’un ticket est normalement toujours imprimé, un appui long peut éviter l’impression pour cette vente.
Vérifiez le nombre de caractères dans les paramètres de votre imprimante dans WaiterOne (voir données -> imprimantes -> votre imprimante -> ticket -> polices de caractères A et B). En fonction de la marque et du modèle que vous utilisez, réglez le nombre de caractères de la police B sur 56, 57 ou 64. 56 est la valeur par défaut, mais les imprimantes plus récentes semblent utiliser plus souvent 64. Pour la police A, prenez 42 ou 48 selon l'imprimante que vous avez. L'Epson TM-T88 utilise 42 pour la police A et 56 pour la police B. L'Epson TM-T20 utilise 48 pour la police A et 64 pour la police B. Le dernier modèle Epson m30 utilise 48 pour la police A et 57 pour la police B.
Dans les paramètres de votre iPad (pas dans WaiterOne). En bas à gauche, il y a aussi un menu WaiterOne. Ce sont des paramètres qui permettent certains niveaux d'accès au système. Veuillez autoriser l'accès à votre réseau local.
Vérifiez les paramètres d'affichage client. Si vous n'avez pas une imprimante Citizen, vous ne pouvez pas l'activer. WaiterOne envoie des commandes spéciales à l'imprimante et si votre imprimante n'est pas de la marque Citizen, elle risque de devenir instable !
La nouvelle imprimante Epson TM-T20IV a Secure Printing activé par défaut. Pour une meilleure compatibilité avec WaiterOne, Secure Printing doit être désactivé ; sinon l'impression ESC/POS ne peut pas être utilisée correctement.
Ouvrez un navigateur et allez à l'adresse IP de votre imprimante. Connectez-vous en tant qu'administrateur. Le mot de passe administrateur est indiqué sur votre imprimante. Allez ensuite dans Print > Secure Printing et désactivez Secure Printing.
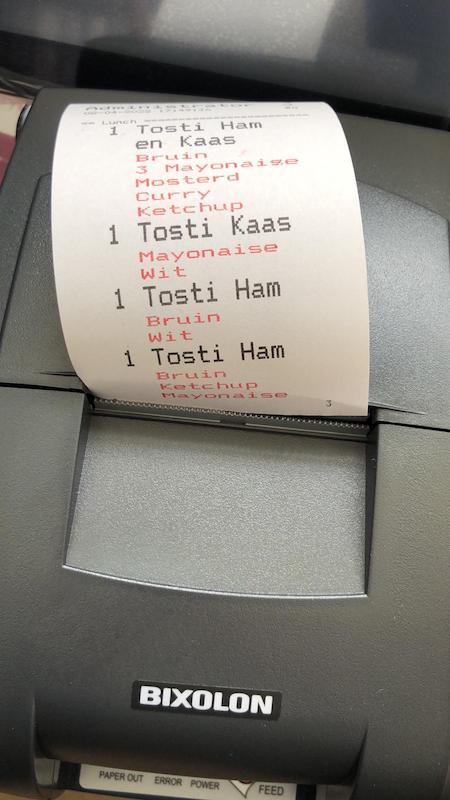
Pas de problème ! Vous pouvez utiliser une imprimante à impact de points. Nous avons effectué des tests avec une imprimante Bixolon SRP-275III avec une interface Ethernet, et cela fonctionne très bien.
Certains clients ont essayé avec une imprimante Epson U-220. Si vous installez une nouvelle carte réseau dans cette imprimante, veuillez activer le commutateur DIP 2-8. Sinon, la carte réseau ne sera pas reconnue. Une fois cela fait, configurez l'imprimante avec le logiciel EpsonNet Config sur votre PC ou Mac.
Pour l'imprimante Star SP700, réglez l'imprimante en mode Epson en désactivant le commutateur DIP 1-4 (il se trouve en bas de votre imprimante).
Maintenant, vous devez effectuer quelques opérations pour configurer cette imprimante dans WaiterOne :
- Allez dans données -> imprimantes -> cuisine -> général et sélectionnez le type d'imprimante ESC/POS.
- Allez dans données -> imprimantes -> cuisine -> paramètres et réglez la police de caractères A sur 33 et la police de caractères B sur 40 (cela dépend bien sûr des spécifications de votre imprimante).
- Dans données -> imprimantes -> cuisine -> paramètres, activez également cet interrupteur : Peut imprimer en rouge.
- En fonction de l'imprimante que vous avez, ajoutez quelques lignes supplémentaires en bas de votre impression ; sinon, la coupe sera trop haute. Nous avons dû ajouter 2 lignes supplémentaires. Allez dans données -> imprimantes -> cuisine -> pied de ticket et ajoutez un saut de ligne pour chaque ligne que vous souhaitez. Par exemple, <br> correspond à 1 ligne, <br><br> correspondent à 2 lignes.
Pas de problème ! Nous avons une application KDS (Kitchen Display System). Utilisez simplement un autre iPad pour suivre vos commandes ? Pas besoin d'acheter une imprimante et d'utiliser des tonnes de papier thermique coûteux. Mais si vous préférez le bruit d'une imprimante à impact, vous pouvez aussi l'utiliser.
KDS et appareils
BREAKING : Bientôt une nouvelle version de WaiterOne.
... mais nous devrons abandonner le support pour les iOS inférieurs à 15.
Veuillez donc remplacer les appareils suivants : iPad 2, 3 & 4, iPad Air 1, iPad mini 1, 2 & 3 + iPhones jusqu'au 6/6 Plus + iPod Touch jusqu'à la génération 6. Ces appareils datent de 2014 et nous ne pouvons plus les supporter. Voir aussi https://iosref.com/ios
Donc, si vous ne pouvez pas mettre à jour votre appareil vers iOS 15, vous devrez le remplacer par un appareil plus récent.
Facile, assurez-vous simplement que les deux appareils sont sur le même réseau :
- Obtenez l'adresse IP de votre iPad où vous avez installé le KDS : paramètres (de votre iPad) -> Wi-Fi : cliquez sur le (i) de votre réseau Wi-Fi. Notez votre adresse IP
- Lancez le KDS
- Sur votre iPad principal où WaiterOne est installé, allez dans données -> imprimantes, configurez une imprimante avec l'adresse IP de votre iPad KDS et choisissez KDS pour le type d'imprimante, testez le KDS en appuyant sur le bouton de test de l'imprimante
BREAKING : Bientôt une nouvelle version de WaiterOne.
... mais nous devrons abandonner le support pour les iOS inférieurs à 15.
Veuillez donc remplacer les appareils suivants : iPad 2, 3 & 4, iPad Air 1, iPad mini 1, 2 & 3 + iPhones jusqu'au 6/6 Plus + iPod Touch jusqu'à la génération 6. Ces appareils datent de 2014 et nous ne pouvons plus les supporter. Voir aussi https://iosref.com/ios
Donc, si vous ne pouvez pas mettre à jour votre appareil vers iOS 15, vous devrez le remplacer par un appareil plus récent.
N'importe quel iPad devrait faire l'affaire, même l'iPad mini 2. N'oubliez pas qu'Apple va parfois très fort. Gardez donc à l'esprit que l'utilisation de la dernière version d'iOS est le meilleur conseil pour investir dans un iPad. Veuillez oublier cet iPad 1. Il ne fait plus tourner le dernier iOS.
N'importe quel iPod à partir de la 5ème génération. N'importe quel iPod fonctionnant sous iOS 9.3 ou supérieur. Le nouvel iPod est génial, alors achetez celui-là (avec une coque pour le protéger en cas de chute). CONSEIL : embauchez des serveurs/serveuses qui possèdent un iPod (ou un iPhone) 🙂
Matériel et accessoires
Vous pouvez connecter 2 tiroirs pour chaque imprimante de tickets que vous utilisez. Si vous souhaitez ouvrir automatiquement le tiroir-caisse à chaque impression de ticket, ajoutez simplement Une autre façon d'ouvrir le tiroir est d'activer le commutateur de tiroir dans les paramètres des serveurs (Données -> Serveurs -> Fonctions spéciales -> Tiroir). Le tiroir peut ensuite être activé ou désactivé en fonction du serveur connecté. Le tiroir doit ici être connecté en tant que tiroir 1 à l'imprimante de facturation.
Tous les supports utilisés sur le site Web de WaiterOne sont fabriqués par Heckler Design. Plus d'infos sur www.hecklerdesign.com. Vous pouvez également envoyer un e-mail à Allan Kiesler pour plus d'informations et les prix, faites-lui savoir que vous utilisez WaiterOne. Tous les crédits photo sur ce site contenant Heckler Design vont à Jill Richards Photography.
Oui, vous le pouvez. Depuis la version 1.1.6, nous avons intégré un scanner de codes-barres. Nous ne travaillons qu'avec les scanners de la série 7 de Socket Mobile CHS. Mais ces scanners sont tout simplement formidables. Veuillez consulter leur site web : www.socketmobile.com.
Les lecteurs portatifs sans fil série 7 de Socket Mobile (CHS). Ils ont quelques modèles et ils les proposent même dans de jolies couleurs vives. Achetez une version 1D, ne prenez pas une version 2D (pour lire les codes QR), car elle n'est pas utilisée dans WaiterOne et est plus chère : CHS 7Ci, CHS 7Di (= durable), CHS 7DiRx (= durable et antimicrobien), CHS 7Mi (= balayage à longue portée et conditions d'éclairage sensibles), CHS 7Pi (= identique à 7Mi + durable). En bref : optez pour le 7Ci ou le 7Di. Si vous choisissez le 7Ci, choisissez une couleur (red, yellow, blue...). Plus d'infos sur leur site web : www.socketmobile.com.
Configurez d'abord votre scanner pour qu'il fonctionne en mode iOS. Il ne fonctionnera pas correctement dans un autre mode. Normalement, vous devriez avoir reçu une fiche de configuration avec votre scanner. Scannez le code de mode iOS. Il y a également une fiche de configuration sur le site web de Socket Mobile. Page 3 contient le code de mode iOS. Vous pouvez également configurer votre scanner pour qu'il émette un bip ou vibre lorsque vous avez effectué un bon scan.
Ensuite, associez votre scanner à votre iPad. C'est un scanner bluetooth, vous devez donc activer le bluetooth sur votre iPad : Paramètres -> Bluetooth
Enfin, activez votre scanner dans WaiterOne : Paramètres -> Code-barres
Oui. L’ancienne intégration des boutons NIU n’est plus prise en charge. Elle a été remplacée par les QR codes WaiterOne, plus simples à installer et sans matériel de bouton supplémentaire.
Avec les QR codes, les clients peuvent utiliser leur propre téléphone dans votre flux de service, par exemple pour appeler le serveur, demander l’addition ou utiliser les fonctions de commande client prises en charge.
Non, nous ne vendons pas de matériel ! Mais nous connaissons des endroits où vous pouvez en trouver. Veuillez comparer les prix car ils peuvent beaucoup varier.
Partenaires privilégiés :
... (Voir la version anglaise pour les liens)
Vous pouvez utiliser la fonction ‚carte menu‘ comme un service supplémentaire pour vos clients. Tout le monde avec un iPhone, iPod ou smartphone y aura accès. C'est amusant et très branché pour eux (et vous). Les changements de prix et les problèmes de ‚rupture de stock‘ sont immédiatement mis à jour. Peut-être pourriez-vous expérimenter cette fonctionnalité en utilisant un iPad supplémentaire comme ‚carte des vins‘ ? Votre entreprise fera sûrement parler d'elle. La ‚carte menu‘ est en cours de révision sérieuse, jetez un œil à notre COS.
Paiements et taxes
Bien sûr que vous pouvez ...
Tout d'abord, allez dans les méthodes de paiement dans les données (en bas).
Créez un nouveau bouton et appelez-le 10% de réduction.
Donnez-lui une belle couleur autre que l'argent liquide, la carte ou la carte de crédit comme sur la photo ci-dessous et donnez-lui les valeurs définies sur l'autre photo !
Une fois défini, attendez un moment, allez aux tables, fermez WaiterOne et redémarrez-le. N'oubliez pas de redélécharger vos télécommandes si vous les utilisez.
La prochaine fois que vous voudrez utiliser les 10%, allez payer, appuyez sur le bouton 10% et choisissez ensuite la méthode de paiement (espèces, carte ou carte de crédit)
Bonne chance et profitez-en. N'hésitez pas à nous promouvoir auprès de vos collègues.
Il existe également une deuxième méthode :
Créez un bouton de prix ouvert et tapez 10% +/- ENTRÉE après avoir appuyé sur ce bouton.
Et une troisième méthode :
Créez divers prix par bouton. WaiterOne peut actuellement gérer 3 prix par produit. Pour passer à un autre niveau de prix, appuyez sur le numéro des touches spéciales (là où se trouvent maison et retour). La touche avec les niveaux de prix passe de 1 à 2, à 3 puis revient à 1. Il y a aussi une visualisation sur l'écran principal qui s'allume si vous travaillez sur le niveau de prix 2 ou 3.
- Création de différentes méthodes de paiement dans Données -> Paiements :
Pour configurer diverses méthodes de paiement, rendez-vous sur Données -> Paiements. Chaque méthode de paiement doit avoir une valeur associée, représentant sa conversion dans votre devise locale. Par exemple, utilisez '1' pour l'argent liquide et '0,92' pour les dollars si vous travaillez en euros. Si vous avez des bons de paiement personnalisés, vous pouvez ajouter leur valeur respective dans le champ de valeur. Si vous souhaitez créer un bouton de pourboire, réglez la valeur sur '1' et activez le bouton de service. - Activation de l'encaissement et choix d'une méthode de paiement par défaut dans Paramètres -> Général -> Facture :
Pour activer l'encaissement et spécifier une méthode de paiement par défaut, accédez à Paramètres -> Général -> Encaissement. L'activation de l'encaissement simplifie le processus de fermeture de la table en vous permettant de sélectionner une méthode de paiement. Lorsque vous ne choisissez pas de méthode de paiement lors de la fermeture de la table, la méthode de paiement par défaut sera appliquée. De plus, la méthode de paiement par défaut est utilisée pour effectuer des remboursements aux clients, par exemple lorsque le client paie avec une carte et reçoit de l'argent en retour. Veuillez éviter de définir la carte ou le pourboire comme méthode de paiement par défaut.
Pour gérer des cours dans WaiterOne pour différents cours (comme des entrées ou des plats principaux), suivez ces étapes :
4 choses à faire pour configurer SumUp dans WaiterOne :
Vous avez besoin de la version 1.7 ou supérieure de WaiterOne.
3 choses à faire pour configurer Zettle dans WaiterOne :
Vous avez besoin de la version 1.6 ou supérieure de WaiterOne.
Il y a 2 choses à faire pour configurer Payconiq dans WaiterOne :
Un code QR sera désormais imprimé avec chaque facture, vous pouvez le scanner avec l'application Payconiq, lors du paiement la table sera automatiquement débitée dans WaiterOne.
Oui, WaiterOne est indépendant des devises. £’s, $’s, €’s, TL ou CHF, peu importe !
Oui, nous savons que la réglementation en matière de TVA/taxe peut être assez compliquée dans certains pays. Veuillez nous envoyer un e-mail si vous avez un problème spécifique concernant ce sujet. Pour le moment, voici comment configurer WaiterOne pour travailler avec un taux de TVA/taxe différent pour les articles vendus à emporter:
- Créez les différents taux de TVA/taxe dans données -> TVA/taxe, par exemple 6%, 12% et 21%
- Sélectionnez pour chaque groupe et produit la TVA/taxe pour les ventes normales (TVA/taxe 1) et pour la vente à emporter (TVA/taxe 2). Dans certains pays, les boissons alcoolisées ont toujours le même taux de TVA/taxe, tandis que la nourriture a un taux de TVA/taxe plus bas lorsqu'elle est vendue à emporter.
- Créez une table à emporter et sélectionnez la TVA/taxe 2 comme niveau. Dans les situations normales, vous aurez toujours la TVA/taxe 1 comme niveau.
Services et avancé
Nous ajoutons de nouvelles langues à chaque mise à jour maintenant. WaiterOne est déjà traduit en 18 langues : Chinois, Danois, Néerlandais, Anglais, Français, Allemand, Grec, Italien, Japonais, Norvégien, Polonais, Portugais, Suédois, Russe, Serbe, Espagnol, Thaï et Turc. Si vous voulez aider ou si vous avez trouvé une mauvaise traduction ? Faites-le nous savoir.
Envoyez-nous votre carte de menu ou la disposition de votre restaurant, nous le ferons pour vous à un prix raisonnable ! En fait, nous ne le faisons pas nous-mêmes, mais nous connaissons des personnes qui peuvent le faire.
Veuillez vous assurer d'enregistrer correctement votre fichier CSV avant de l'importer dans WaiterOne.
Dans Google Sheets en tant que valeurs séparées par des virgules (.csv) :
Dans Microsoft Excel en tant que fichier CSV Windows (.csv) :
Si vous pensez pouvoir vendre et prendre en charge WaiterOne, mais que vous voulez l'utiliser sous votre propre nom. Envoyez-nous un e-mail. Avez-vous des idées pour une autre façon de travailler ensemble ?
Ne jamais dire jamais. Mais il n'y a tout simplement pas de besoin de le faire ! Non ? L'écosystème d'Apple, iOS, l'iPad et l'iPhone est tout simplement parfait. Nous n'avons donc aucune intention de réécrire le code pour Android. N'oubliez pas que WaiterOne est écrit en code natif, rapide et efficace en Objective-C. Le faire fonctionner sous Android ne serait pas possible ou nous devrions le réécrire et le maintenir simultanément.
Alors pourquoi d'autres ont-ils des solutions qui fonctionnent sur n'importe quel appareil (sur iPad, Android, Mac, PC, …) ? Facile, elles ne sont pas natives, elles utilisent la technologie des sites web (html 5/jQuery/…) pour créer une solution (lente et peu fiable) pour la faire fonctionner sur n'importe quel navigateur sur n'importe quel appareil, parfois elles cachent même le navigateur pour que vous pensiez que c'est natif (ils vous vendent une application qui ouvre un site web dans une boîte). Mais en réalité, c'est un site web avec vos produits et ventes, fonctionnant dans un centre de données quelque part dans le monde.