
WaiterOne Remote
Your guide to taking orders and looking after guests with WaiterOne Remote on iPhone and iPad.
About this guide#
Remote is the staff companion to your main WaiterOne point-of-sale system. Use it for restaurant tables, orders, bills, and supported payment workflows. Manage your menu, prices, staff permissions, and printer routing in WaiterOne.
This guide covers the Remote 1.5.16 interface. Check it against the version installed at your venue before staff training. Available actions depend on your permissions, downloaded configuration, and the versions of both apps. This guide does not certify that every feature is already available in your App Store version.
The instructions retain English screen labels in bold so you can identify them in the example screens. Labels may be translated on your own device. Screenshots illustrate the interface, not proof of a successful connection, order delivery, or payment.
The screenshots show first-use screens on an unconnected demonstration iPhone, with no live customer information. They are shared across the six language editions with translated captions. The displayed switch positions are examples, not a recommended connection configuration.
Before you begin#
- Use an iPhone or iPad compatible with your installed Remote version.
- Keep the main WaiterOne device available and connect both devices to the venue's trusted staff network. A guest network can block communication between devices.
- Ask the manager to enable Remote communication in WaiterOne and provide the correct main-device address.
- Allow Local Network access for the communicating apps in iOS or iPadOS settings. Bluetooth permission may be needed for payment terminals; Camera access is needed for scanning.
- Have your own staff code ready. Use your own account so orders and attendance are assigned correctly.
Remote needs a working connection to WaiterOne for service operations. A downloaded menu on the screen does not prove that a new order has reached the POS, kitchen, or printer. Do not treat Remote as an independent offline till.
Connect and download#
Do both setup steps below on the main WaiterOne iPad, not on the staff device running Remote.
Set the main iPad's location access to Always#
- Open the iPad's Settings app, not the settings inside Remote.
- Go to Privacy & Security > Location Services and make sure Location Services is on.
- Select WaiterOne in the app list.
- Set its location access to Always, not While Using the App. This setting belongs to the main WaiterOne app, not WaiterOne Remote.
Always permits location access in the background. WaiterOne uses this to support Remote communication while the main app is in the background. It does not replace Local Network permission or guarantee operation after the app is force-quit. See Apple's location-permission guide.
If WaiterOne or Always is not yet listed, open WaiterOne and try the server-activation step below to request location access. Then revisit these iPad settings. If Always remains unavailable, ask your administrator or support.
Activate the Remote server in WaiterOne#
- Open WaiterOne on the main iPad and sign in with an account allowed to open settings.
- Open Settings, expand General if necessary, and select WaiterOne Remote.
- Turn on Activate Remote server. The main device's network name and IP address are shown beneath this section. If automatic discovery does not fill Remote's Host, use the main iPad's displayed IP address.
- If a location warning appears, the activation switch stays off. Tap Settings in that warning or follow the location steps above, choose Always, then return to WaiterOne and turn on Activate Remote server again.
- Confirm the switch is on and keep it enabled during service. Reopen WaiterOne and check the server after restarting the main iPad.
First connection#
- Complete the main-iPad location and server steps above. Keep WaiterOne open while you connect the staff device.
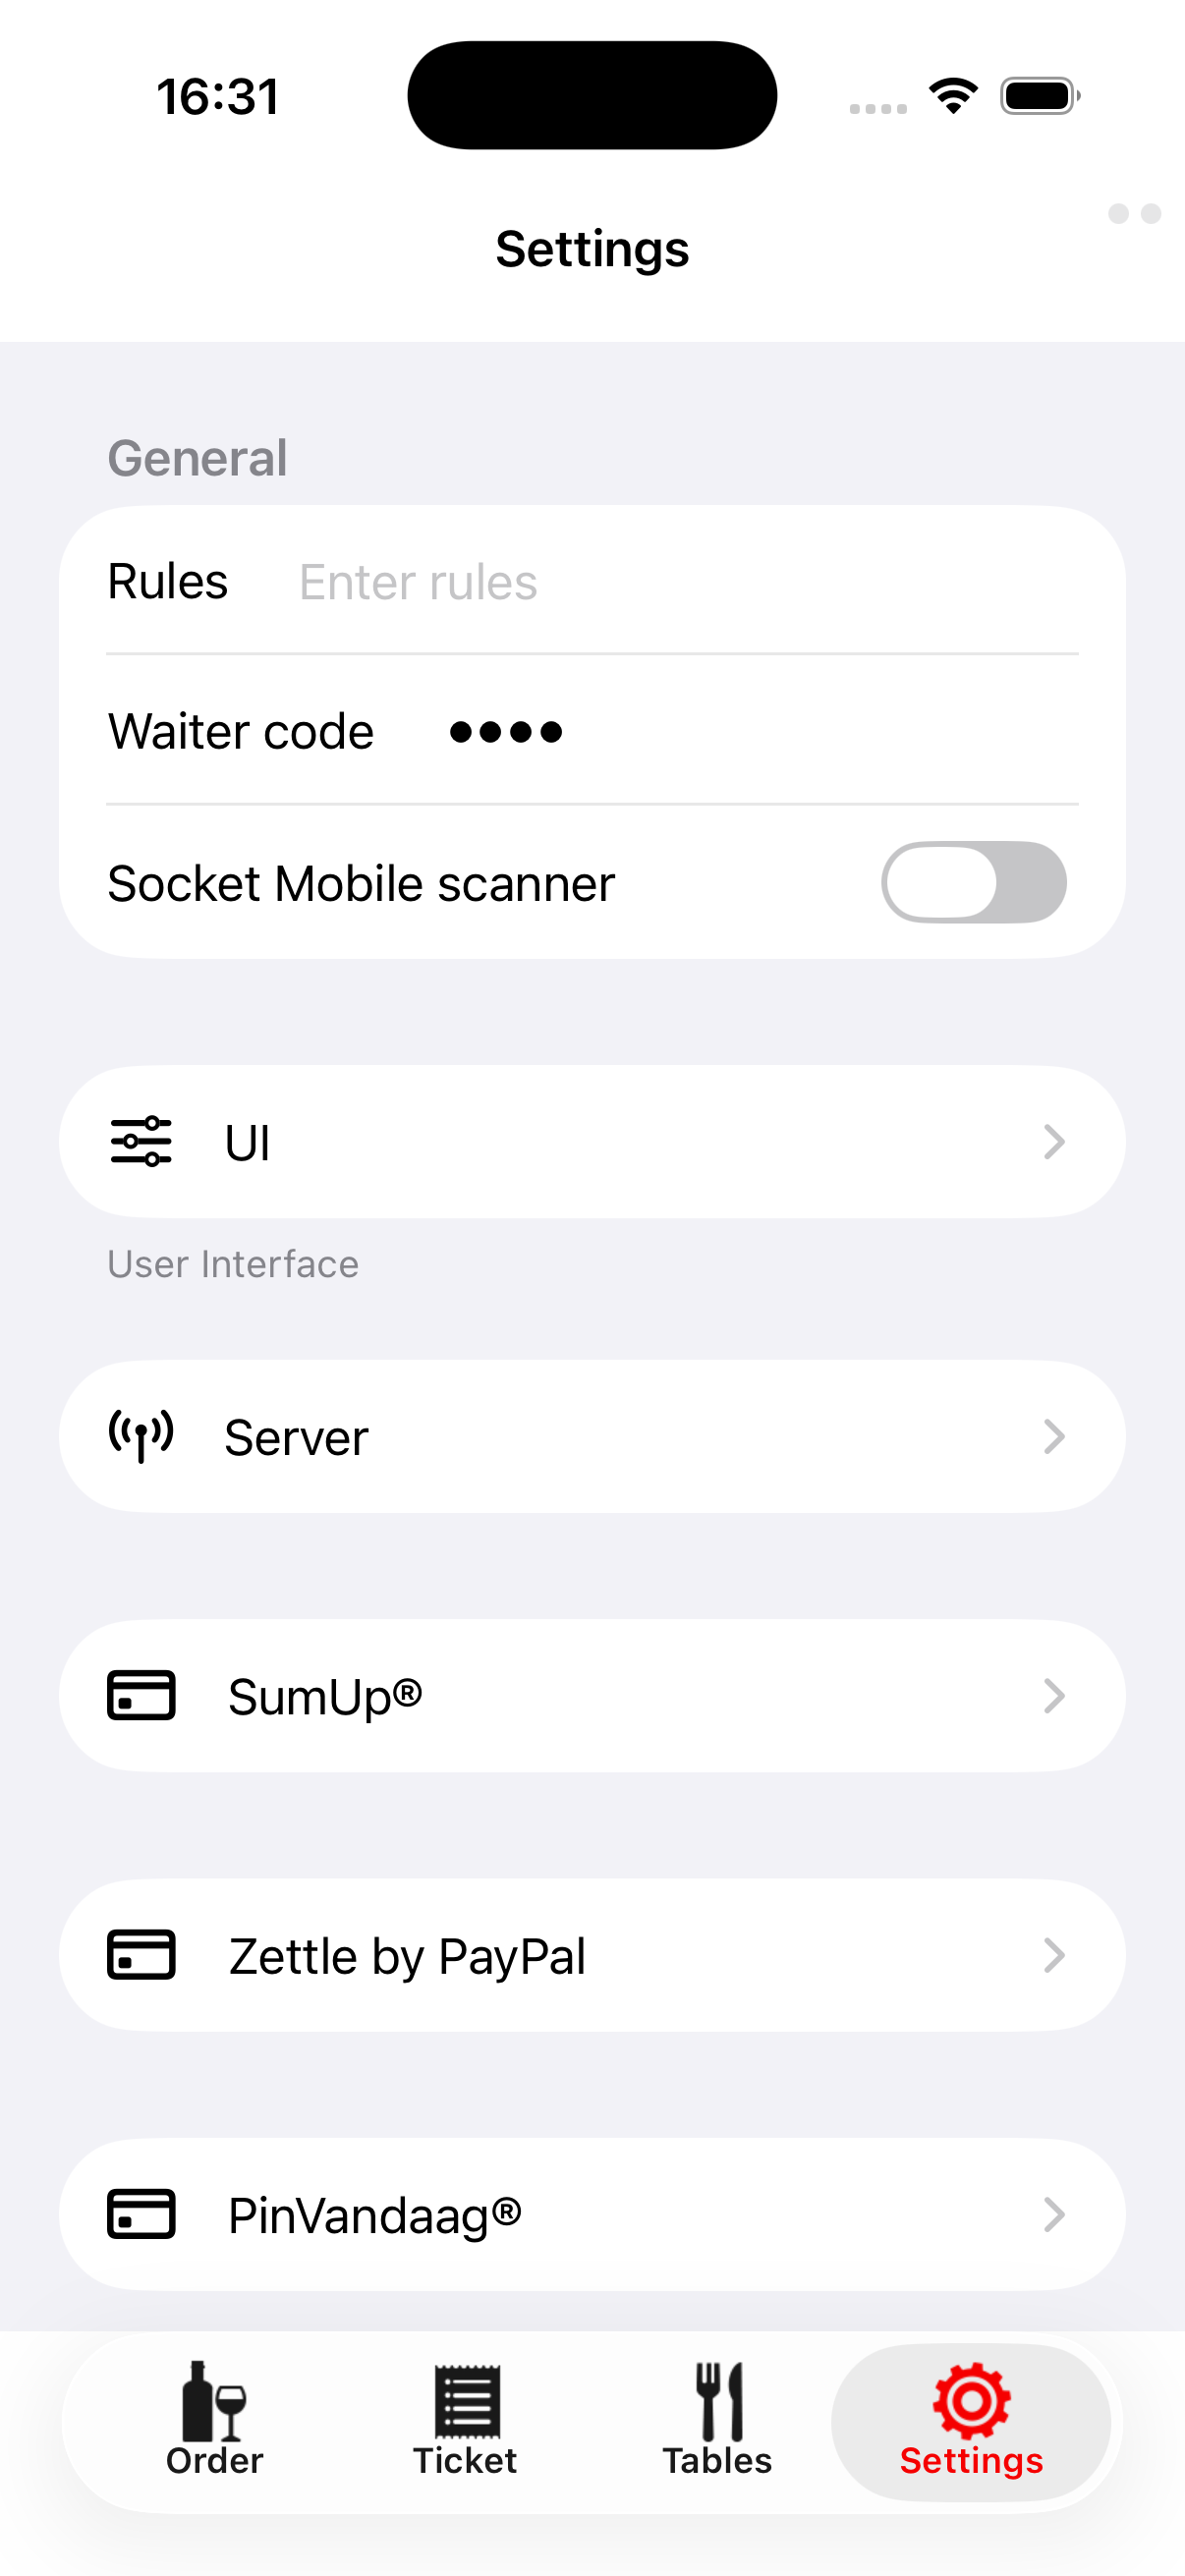
- Open Settings in Remote. Settings remains available while you are signed out.
- Under Server, check Host. It is the address or hostname of the main WaiterOne device, not the address of this staff device. Discovery may fill it in; if not, ask the manager for the correct value. Never copy an example address from a screenshot.
- Keep your venue's approved communication settings. The usual setup has Sockets, P2P, and APN enabled. Do not use UDP alone for a download.
- Tap Download. Wait for the result reporting how many buttons were downloaded and from which main device.
- Check that the expected product pages, payment methods, tables, and courses are present.
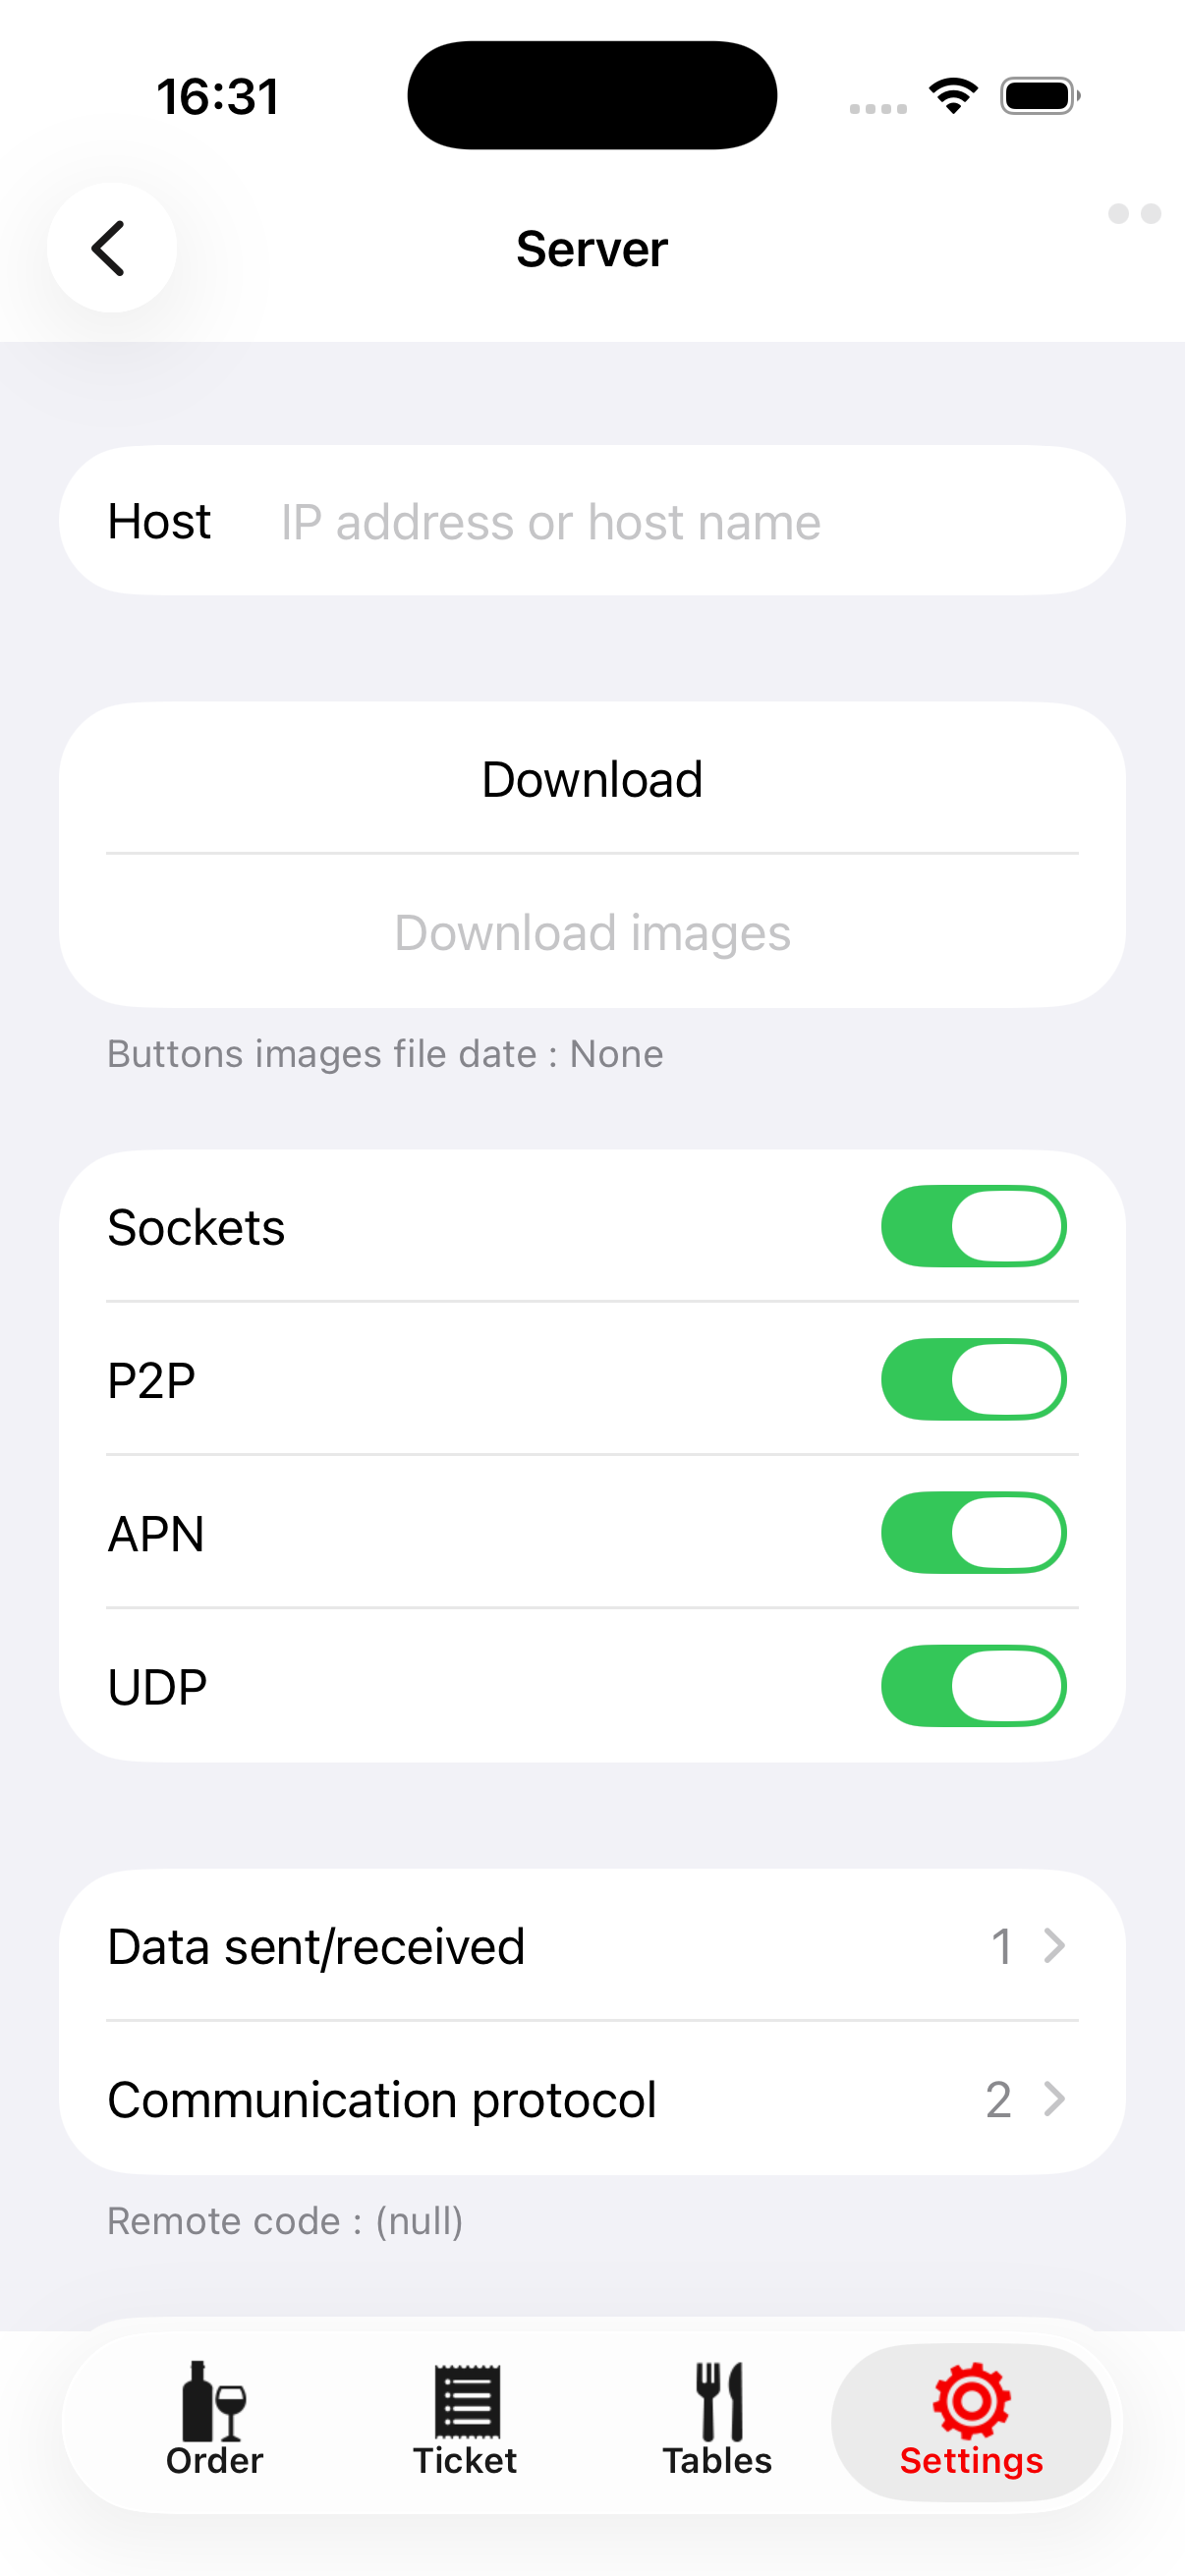
During download, Contacting WaiterOne, Waiting for response, or a transport status indicates progress, not completion. If No response from WaiterOne appears, follow Connection problems.
Product images and menu changes#
Download images is a separate action. It requires a completed pairing/download and Sockets enabled. Use it if the menu uses product pictures; the result may say that there are no images or that the images are already current.
When the manager changes menu buttons, price levels, tables, or related settings in WaiterOne, arrange another Download outside active order entry. Check the updated menu before service. Do not switch to a different main POS while an order or payment needs resolving.
Prove the setup before service#
With the manager's approval, sign in and use a clearly identified test table. Send a small test order and check the actual result in WaiterOne and at its intended kitchen/bar destination. Deal with the test ticket using the venue's normal procedure. Seeing activity or completing a download is not an end-to-end delivery test.
Sign in, lock, and register time#
Enter your assigned code when Please enter user code appears. Tap Enter if required; some code lengths submit automatically. Text codes are also supported. If you see Wrong waiter code or no connection to iPad server, check both the code and connection. User inactive, please activate it requires manager action.
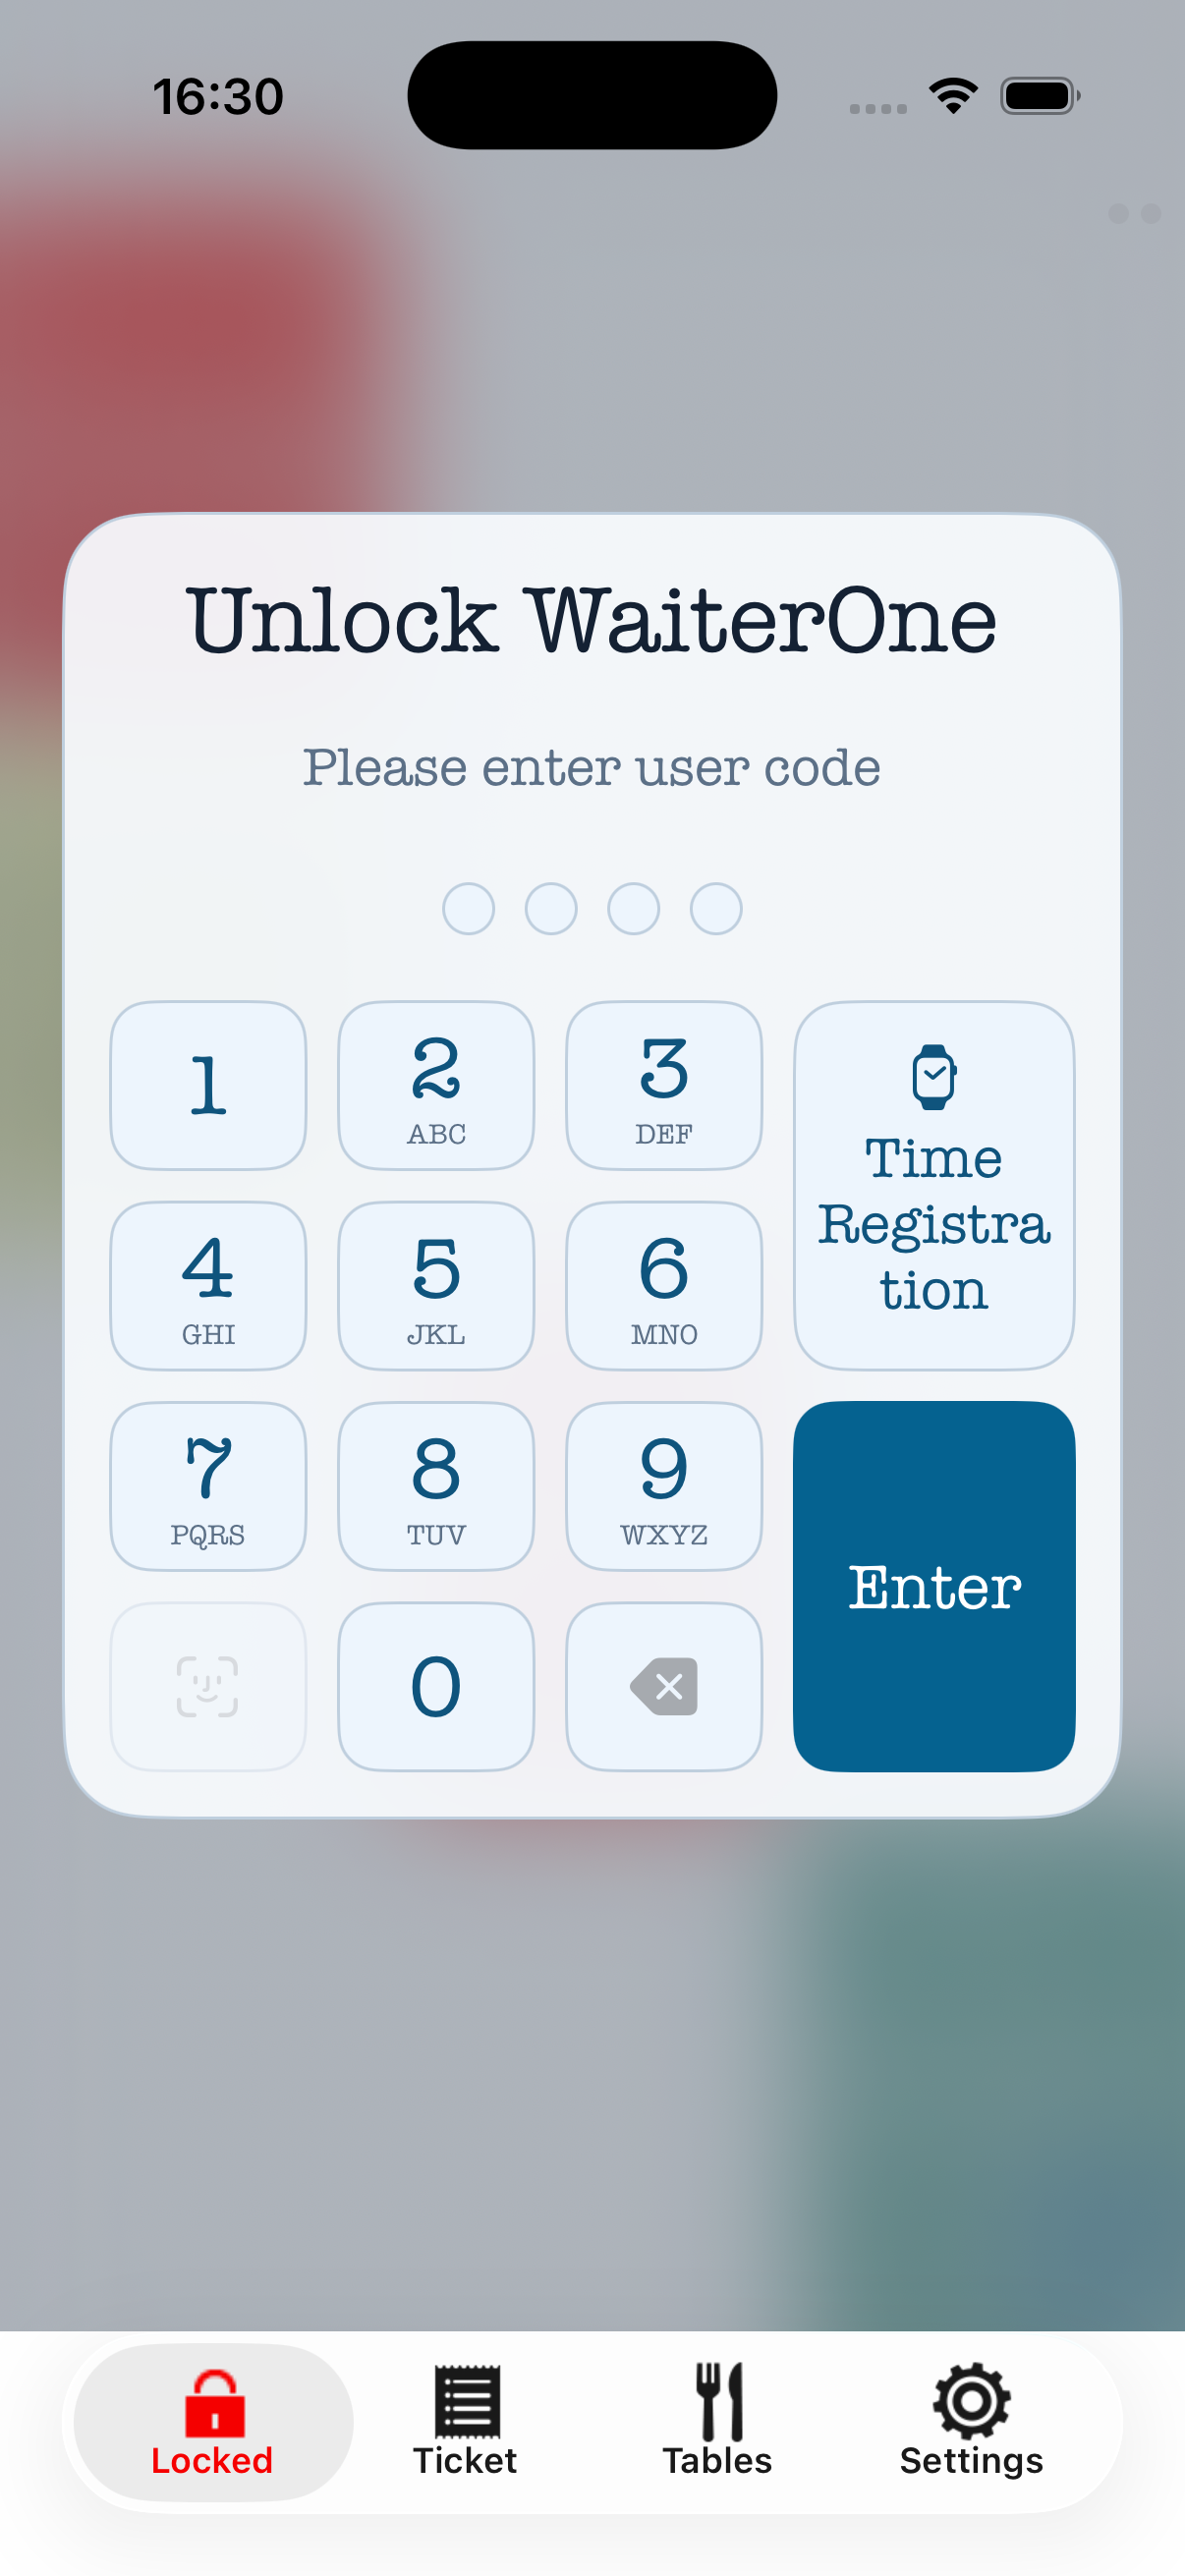
Face ID or Touch ID can use a saved Waiter code where configured. It still submits that code to WaiterOne and does not provide independent offline login. Do not save another employee's code on a shared device.
On iPad, tapping the selected Click to lock tab locks the screen. On iPhone, tapping the selected Order tab opens actions including Log out. Lock or log out when handing over the device.
Use Time Registration to open Shift Clock code entry. Available actions include Work in, Work out, Break start, and Break end. If an earlier shift remains open, resolve it before starting another. Availability depends on your venue and staff setup; follow the manager's attendance procedure rather than creating a second shift to work around a warning.
Find your way around#
| Screen or control | Use it for |
|---|---|
| Order | Product pages and new order entry. On iPad the ticket is visible alongside the products. |
| Ticket | Review and edit the current ticket, especially on iPhone. |
| Tables | Select a restaurant table and move between configured floorplans. |
| Settings | Connection, downloads, display options, payment setup, and diagnostics. |
| Stock | Authorized stock lookup and counting when this tab is available. |
Use configured page buttons or swipe between product pages when swiping is enabled. Search products is another route when available. The venue controls the menu layout, so two devices can show different layouts or permissions.
The Tickets shortcut, if present in the menu, opens the current Ticket screen. It is not a browser for historical paid tickets. Use the main POS for history or reprinting according to your venue's procedure.
Open and manage a table#
- Tap the intended table on Tables, or open Tables / Clients from the ticket header's table-selection area.
- Use Search table or create a new one to find a table or client. If temporary tables are permitted, a typed name can offer Open “…” as a new table.
- Check the table name and existing ticket before adding anything. Do not create a new temporary table merely because the expected table could not be reached.
- Tap the table-details area of the ticket header to enter Number of covers and Remarks, then Enter. Covers means the number of guests or place settings, not a product quantity.
Floorplan arrows move between the configured areas. If a table belongs to another employee and your permissions do not allow access, Remote can show You are not allowed to open this table/tab. Ask the manager for help.
Move a table assignment#
With the correct table open, use Move in the table chooser where available, select the destination, check both names, and confirm Move table. Floorplans also support dragging an open table onto another table, including across the floorplan arrows.
A move changes the order's table assignment. It is not just rearranging furniture on a drawing. Check the destination ticket and coordinate with colleagues before confirming, especially if the destination is already occupied.
Enter an order#
- Confirm your staff account and the table or client name.
- Tap a product button or select a search result. Check the added name, quantity, and price in the ticket.
- Answer any modifier, Open Price, or Enter text prompt. Confirm the entry with Enter where shown.
- Add the requested modifiers or preparation notes to the intended product, then check their position in the ticket.
- Select the correct meal course with Courses when your venue uses courses.
- Review the complete new order before using an action at the bottom.
An ordinary course selection applies to the next product. Holding Courses opens a persistent course selection where supported. Check the course shown on the ticket before sending.
A two-finger product tap can enter two units. If the quantity is unexpected, correct it before sending. Open prices, discounts, and special actions depend on staff permissions and the venue's rules.
Stock badges are an aid to availability. Quantities can change while WaiterOne confirms a stock reservation. If Out of stock / Inactive appears, review the item and confirm what remains in the ticket; do not assume it was accepted. A stock reservation is not a restaurant booking.
Correct and organize ticket lines#
Swipe a line to reveal the actions available for that line. Newly entered items can offer Delete, Duplicate, Split 1, and Merge. Previously submitted items can offer Reorder and, with permission, Void.
- Delete removes an unsent item. Verify the resulting quantity and its modifiers.
- Duplicate or Reorder adds items for a new order. Review them before sending.
- Split 1 separates one unit from a multi-quantity line. Merge combines compatible lines.
- Void corrects a previously submitted item and requires the appropriate permission and venue procedure. It is not the same as silently deleting an unsent mistake.
Pull upward at the bottom of the ticket to use Sort + Crunch where available. Review quantities, courses, and attached modifiers afterwards.
Always read the whole ticket, including earlier orders and the new section. Line selection is not a promise that only that line will be sent by Order, Hold, Bill, or Pay.
Hold, send, request the bill#
The bottom action bar offers Order, Bill, and Pay. Swipe right across this bar to reveal Hold; swipe left to hide it again. These are tap actions, not long-press menus for sending selected lines.
| Action | Intended use |
|---|---|
| Hold | Ask WaiterOne to hold the current new order for later handling. Confirm your venue's release and printing procedure. |
| Order | Send the current new-order section to WaiterOne for normal order handling. |
| Bill | Request bill handling from WaiterOne, including any current new-order section. Check the actual bill and printer result. |
| Pay | Start the venue's payment workflow. With tendering enabled and an amount due, this opens payment choices. |
These actions concern the current new-order section, not a highlighted subset of lines. Check the table, quantities, modifiers, and courses before tapping.
Hold is not confirmation that the kitchen has started preparation. Bill is not confirmation of payment. Remote's on-screen activity is not proof that a printer produced a slip. Verify the outcome when anything is uncertain.
If your venue uses Suite, follow its agreed course/service procedure and verify the receiving team's response. Do not use it as a substitute for checking that the original order was received.
Payments and splitting#
Take a payment#
- Open the correct table and review the full ticket.
- Tap Pay. If payment choices appear, choose the configured payment method.
- Check Due, the entered amount, and Change. Follow the venue's rules for cash, tips, and partial payments.
- For a card terminal or Tap to Pay, follow the provider's on-screen steps and check the actual result.
- Confirm the resulting ticket/payment state in WaiterOne before handing the guest a receipt or taking another payment.
SumUp, Zettle by PayPal, PinVandaag, and Tap to Pay are conditional on the venue's setup, supported device/provider, staff permissions, and availability. Their presence in Settings does not mean every option is ready to accept payments. Setup credentials belong to the manager and must not be shared in screenshots.
A timeout or an unclear Remote message is not proof that a card charge failed. Check the terminal/provider transaction history and WaiterOne before trying again. If the results disagree, involve the manager or support. Never repeatedly charge the guest to resolve a communication warning.
Split a ticket#
With permission, open Split. Review the two sides and tap quantities to move items between them. Check each side's items, modifiers, covers, and total, then confirm Split. Splitting a ticket is separate from completing a payment: check the resulting ticket assignments before charging either part.
Ask the manager when an action is disabled. Do not use someone else's account to bypass a restriction.
Check and count stock#
The Stock tab is available only to authorized signed-in staff. Use Search stock, the All groups filter, and refresh to find the products you need. Stock is shared with the main WaiterOne system, so other devices can change it during your count.
For a count, open Quick Count, enter the counted quantities, choose Review, and verify the proposed changes before Submit count. Blank quantities are skipped. A count must be non-negative; enter zero only when you really counted no remaining stock.
If a timeout or changed-stock conflict occurs, refresh and check the actual stock before submitting again. Do not repeatedly submit an old count over newer service activity. Coordinate inventory adjustments with the manager.
Connection problems and pending messages#
Nothing downloads or sign-in fails#
- Confirm the main WaiterOne app is available and its Remote server is enabled.
- Check the trusted network, Local Network permission on both devices, and the main-device Host.
- Keep the venue's approved communication settings. Do not enable UDP alone or change several settings at once.
- Try the relevant Ping with Sockets, Ping with P2P, Ping with APN, or Ping with UDP under Server if your manager asks. A ping checks that path, not an entire order or payment.
- Use Data sent/received and Communication protocol to review activity with support.
Orange tab bar or unresolved action#
An orange tab bar indicates important messages awaiting acknowledgement. On iPad a pending count can also appear.
Restore the connection and check what actually happened on the main POS, kitchen destination, or payment provider. Do not recreate an order or charge because a reply was delayed. Keep Remote open while resolving pending activity; do not force-quit, reinstall, or reset data as a first troubleshooting step.
Resend failed messages is a recovery tool for unacknowledged operations. Use it after checking the actual result, preferably with your manager or support. Message resent correctly or All messages resent correctly means that Remote dispatched the message again; it does not prove that WaiterOne acknowledged it.
Before moving to another device, make a clear handover of the table, time, action, and confirmed result. There is no promise here that pending activity will survive an app restart.
Settings, privacy, and support#
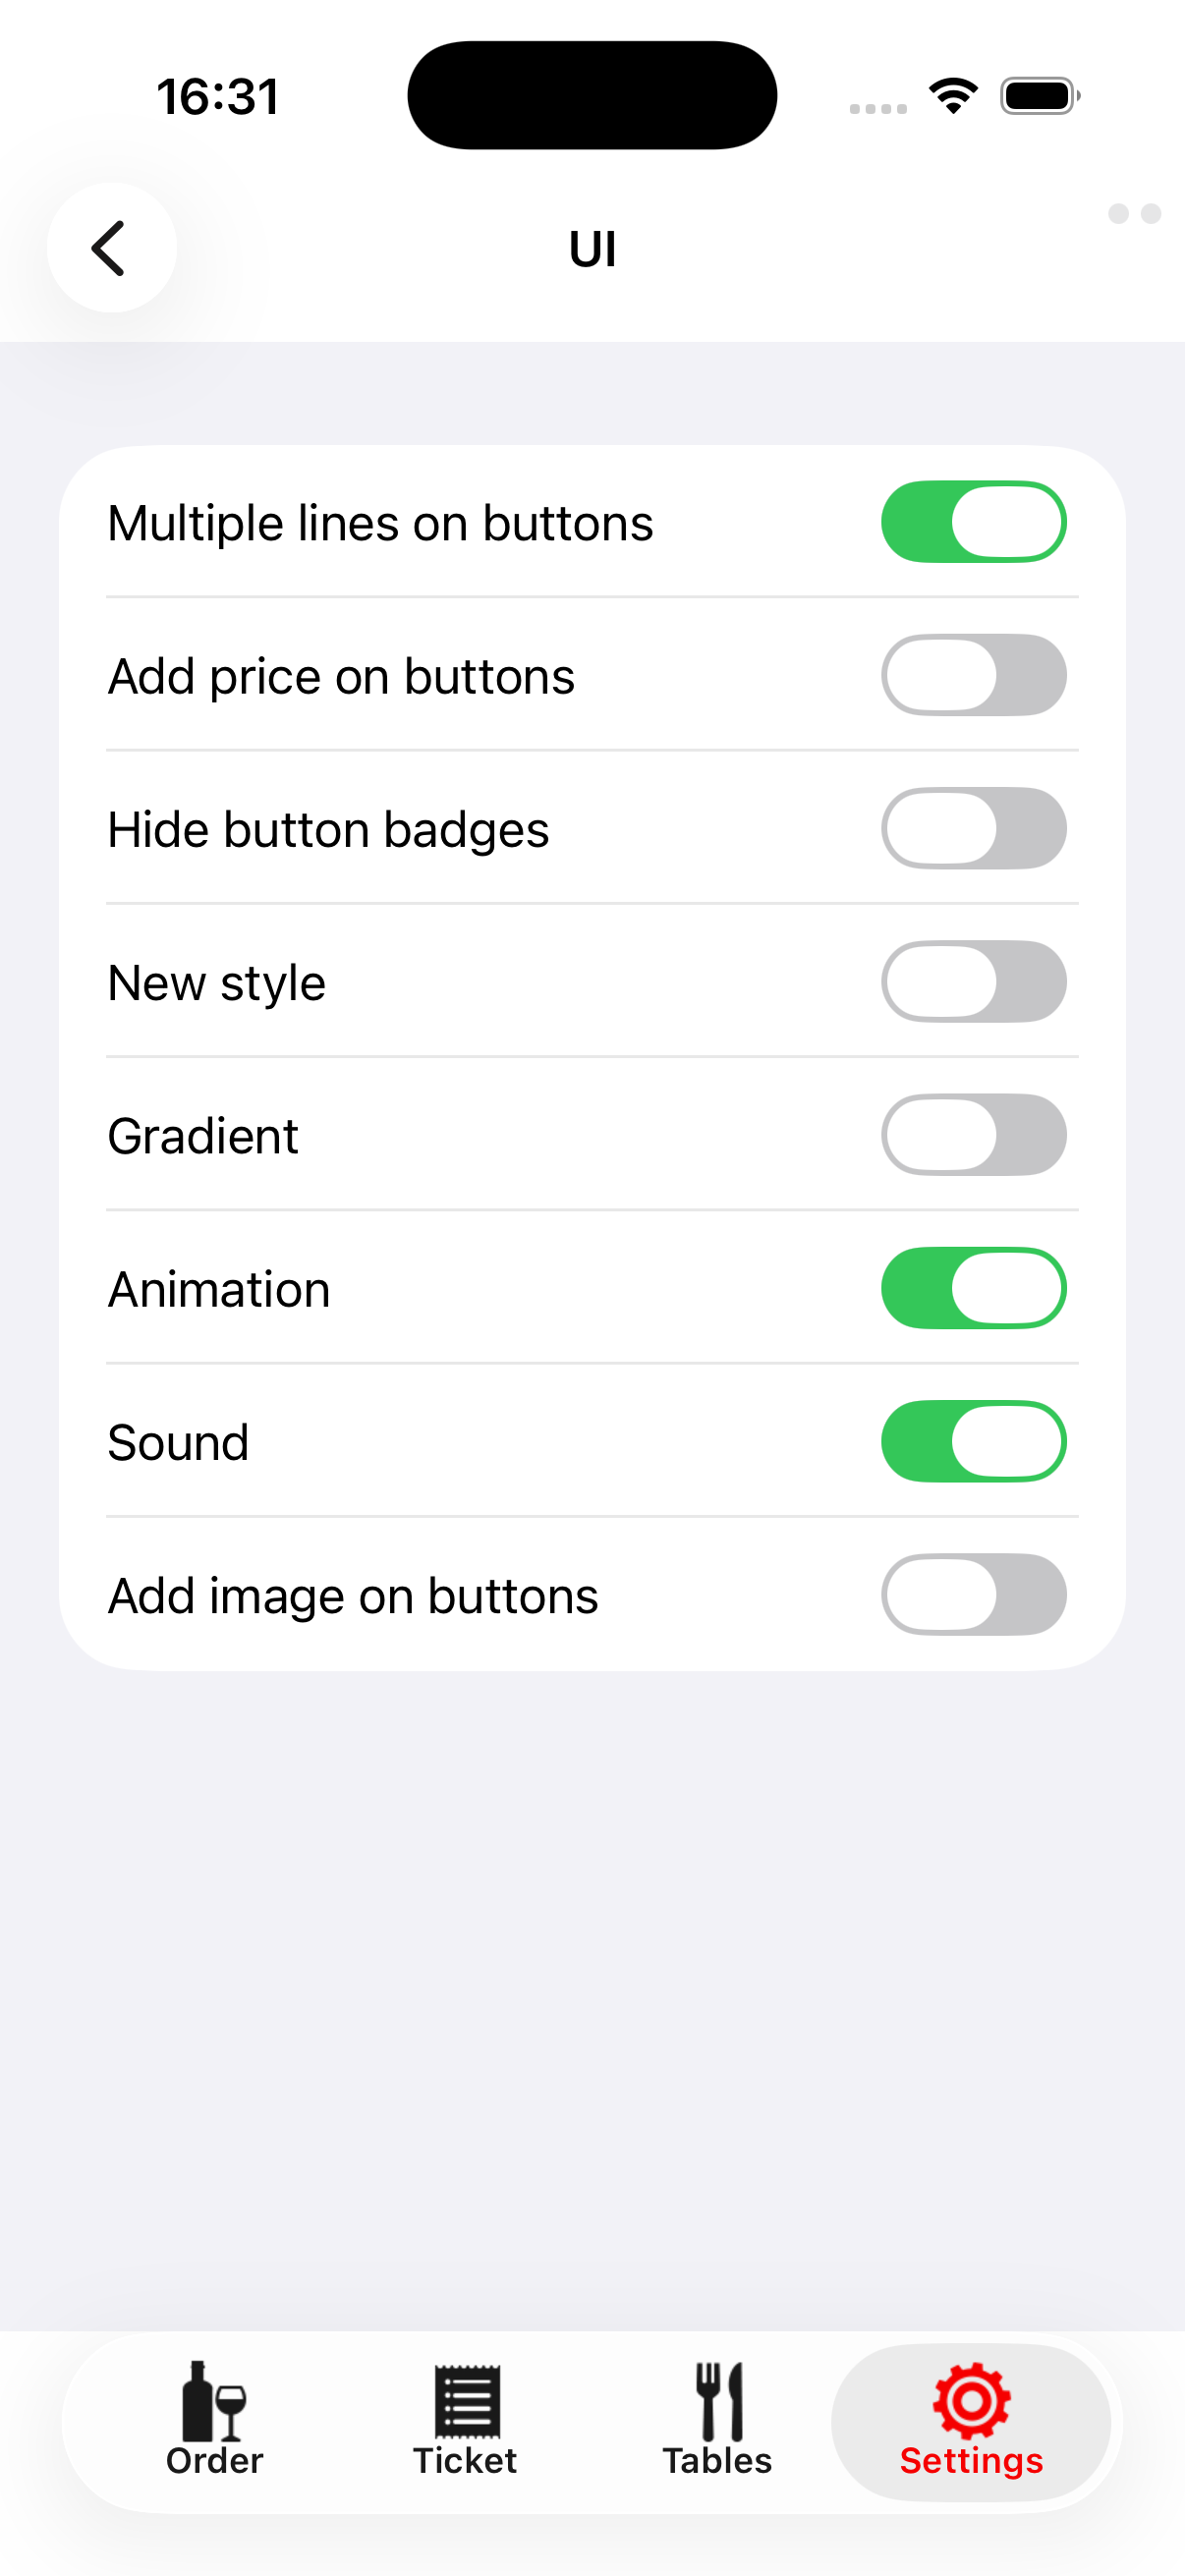
Use Settings > UI for the display options available in your version. Keep menu navigation and text readable for service. The manager should handle communication and payment settings, saved staff codes, and changes that affect shared work.
Send support diagnostics prepares an email with a database snapshot, log, and communication report. Apple Mail must be configured. Review the privacy warning and the message before sending: these attachments can contain business, order, user, and device information. Send them only to trusted support, and do not post them publicly.
For help, contact support@waiterone.net. Include the Remote and WaiterOne versions, device model, affected table/ticket, time of the problem, exact message, and what the main POS or terminal shows. Never include passwords, API keys, or full card details.
For broader main-POS configuration, see the WaiterOne manual. This Remote guide does not replace payment-provider instructions, staff permissions, or your venue's accounting procedures.
Service checklists#
Before opening#
- Charge the device, confirm the network and correct main POS, and sign in with your own code.
- Check the menu, tables, prices, and stock information after any planned download.
- Complete the agreed test order and verify its destination.
- Check configured payments separately with the manager's approved procedure.
Before sending each order#
- Check table/client, guest count, products, quantities, modifiers, and meal courses.
- Choose Hold, Order, Bill, or Pay deliberately.
- Resolve warnings and verify uncertain results before repeating anything.
At handover or closing#
- Resolve pending messages and uncertain payments with the manager.
- Check open tables and held orders in the main POS.
- Complete attendance actions when required, then lock or log out.
- Pass on unresolved issues with enough detail for the next staff member.